Install Pixelview (AIO Setup)
In non HA setup, we setup all components of the PixelView app and automation services on one sigal server as All In One (AIO) setup. We use docker compose to setup the components and run all components in docker containers.
Host Requirements
Before proceeding with the installation, ensure that you have Docker and Docker Compose installed on your system. To do so, you can follow the instructions provided on the docker's website.
System Recommendation
8 vCPU, 16GB RAM, 1GB network
Steps to Install
Copy Docker Compose File
Create a directory for your project and create a file named docker-compose.yml. Copy the provided service configurations into this file.
| docker-compose.yaml |
|---|
| services:
mongodb:
image: mongo:8.3.8
container_name: mongodb
restart: always
# this version of mongo db has issue with linux kernel 6.19 and above
# if it doesn't start or keeps restarting, uncomment this.
# environment:
# GLIBC_TUNABLES: glibc.pthread.rseq=1
volumes:
- ./pixelview-data:/data/db
network_mode: host
rabbitmq:
image: ghcr.io/pixelvirt/inithive-rabbitmq:latest
container_name: rabbitmq
restart: always
environment:
RABBITMQ_PASSWORD: dcW41MPUlM54uw2
RABBITMQ_USER: alertagility
network_mode: host
pixelview-frontend:
image: ghcr.io/pixelvirt/pixelview-frontend:v0.0.1
container_name: pixelview-frontend
restart: always
environment:
ANSIBLE_BACKEND_URL: localhost:8000
BACKEND_URL: localhost:9090
BACKUP_BACKEND_URL: localhost:9191
CHAT_BACKEND_URL: localhost:8765
HOST_MANAGEMENT_BACKEND_URL: localhost:8080
KUBERNETES_BACKEND_URL: localhost:4000
OPENSTACK_BACKEND_URL: localhost:8005
PIXELVIEW_URL: localhost:9090
network_mode: host
pixelview-backend:
image: ghcr.io/pixelvirt/pixelview-backend:v0.0.1
container_name: pixelview-backend
restart: always
environment:
AUTH_KEY: 6c673f51-6045-47b0-8745-eef9d165a310
DEX_ISSUER_URL: https://dex.pixelvirt.com/dex
DEX_REDIRECT_URI: https://cloud.pixelvirt.com/api/auth/callback
OPENSTACK_MIDDLEWARE_URL: http://localhost:8005
MONGO_URI: mongodb://localhost:27017/alertagility
DOMAIN: pixelvirt.com
SUBDOMAIN: alertagility
RABBITURL: amqp://alertagility:dcW41MPUlM54uw2@localhost:5672/alertagility
ENVIRONMENT: dev
KAMAJI_KUBECONFIG: /root/kubeconfig.yaml
SERVICE_IP:
network_mode: host
volumes:
- ./kubeconfig.yaml:/root/kubeconfig.yaml
pixelview-escalation:
image: ghcr.io/pixelvirt/pixelview-escalation:v0.0.1
container_name: pixelview-escalation
restart: always
environment:
AUTH_KEY: 6c673f51-6045-47b0-8745-eef9d165a310
MONGO_URI: mongodb://localhost:27017
RABBITURL: amqp://alertagility:dcW41MPUlM54uw2@localhost:5672/alertagility
network_mode: host
pixelview-openstack:
image: ghcr.io/pixelvirt/pixelview-openstack:v0.0.1
container_name: pixelview-openstack
restart: always
environment:
AUTH_KEY: 6c673f51-6045-47b0-8745-eef9d165a310
GOPHER_CLOUD_DEBUG: true
MONGO_URI: mongodb://localhost:27017
MONGO_DBNAME: dashboard_db
PIXELVIEW_URL: http://localhost:9090
extra_hosts:
- "newcloud.pixelvirt.com:138.199.223.176"
network_mode: host
pixelview-kubernetes:
image: ghcr.io/pixelvirt/pixelview-kubernetes:v0.0.1
container_name: pixelview-kubernetes
restart: always
environment:
AUTH_KEY: 6c673f51-6045-47b0-8745-eef9d165a310
GET_CONFIG_FROM: bla
KUBECONFIG_FILE: /usr/src/app/kubeconfig
MONGO_URI: mongodb://localhost:27017
PIXELVIEW_URL: http://localhost:9090
network_mode: host
pixelview-ansible-server:
image: ghcr.io/pixelvirt/pixelview-ansible-server:v0.0.1
build: .
container_name: pixelview-ansible-server
restart: unless-stopped
environment:
AUTH_KEY: 6c673f51-6045-47b0-8745-eef9d165a310
JOB_INPUT_QUEUE: admin-admin
JOB_OUTPUT_QUEUE: ansible_output
MONGODB_URI: mongodb://localhost:27017
MONGODB_DBNAME: ansible_server_db
PIXELVIEW_URL: http://localhost:9090
RABBITMQ_HOST: localhost
RABBITMQ_PORT: 5672
RABBITMQ_USERNAME: alertagility
RABBITMQ_PASSWORD: dcW41MPUlM54uw2
RABBITMQ_VHOST: /
SERVER_PORT: 8000
network_mode: host
pixelview-patch-management:
image: ghcr.io/pixelvirt/pixelview-patch-management:v0.0.1
container_name: pixelview-patch-management
restart: always
environment:
AUTH_KEY: 6c673f51-6045-47b0-8745-eef9d165a310
SERVER_PORT: 8080
LOG_LEVEL: info
PIXELVIEW_URL: http://localhost:9090
STATIC_API_KEY: dev-key
MONGODB_URI: mongodb://localhost:27017
MONGODB_DBNAME: pixelview
ANSIBLE_SERVER_DBNAME: ansible_server_db
ANSIBLE_SERVER_URL: localhost:8000
LEASE_TTL_SECONDS: 30
HEARTBEAT_INTERVAL_SECONDS: 10
CLAIM_POLL_INTERVAL_SECONDS: 5
REAPER_INTERVAL_SECONDS: 60
ANSIBLE_WATCH_INTERVAL_SECONDS: 5
BLOCKED_REQUEUE_SECONDS: 15
WORKER_COUNT: 4
RECONCILE_INTERVAL_SECONDS: 30
RECONCILE_STALE_AFTER_SECONDS: 120
network_mode: host
# pixelview-backup:
# image: ghcr.io/pixelvirt/backup:latest
# container_name: pixelview-backup
# restart: unless-stopped
# environment:
# AUTH_KEY: 6c673f51-6045-47b0-8745-eef9d165a310
# ALLOWED_ORIGINS: "*"
# DB_TYPE: mongodb
# MONGO_URI: mongodb://localhost:27017
# PIXELVIEW_URL: http://localhost:9090
# PORT: 9191
# network_mode: host
volumes:
data:
|
Important: Service Authentication Key (AUTH_KEY)
Make sure to change the default AUTH_KEY to a strong, secure secret before deploying. The AUTH_KEY must be identical across all PixelView backend services (pixelview-backend, pixelview-escalation, pixelview-openstack, pixelview-kubernetes, pixelview-ansible-server, pixelview-patch-management, etc.) to allow authenticated communication between all services.
Start the containers
Info
Make sure to add the SERVICE_IP to the environment variable of pixelview-backend service. This is the ip of the host that your pixelview-backend container is running on.
Open a terminal window, navigate to the directory where the docker-compose.yml file is located, and run the following command:
This command will start all the services in detached mode, meaning they will run in the background.
Verify Installation
After running the docker-compose up -d command, you can verify that the services are running by executing:
This command will display the status of all the services defined in the docker-compose.yml file.
Accessing the Application
Once the services are up and running, you can access the frontend application at http://localhost
Credentials
- The default username to access the frontend is
admin@localhost
- The default password is
password
Stopping Services
To stop the running services, execute the following command:
This will stop and remove all containers defined in the docker-compose.yml file.
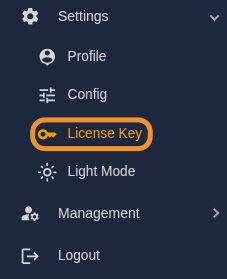
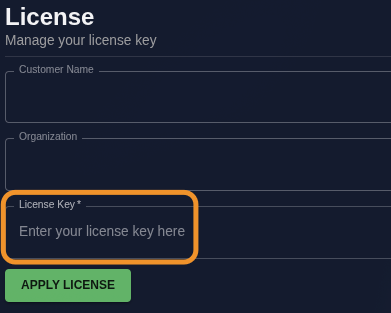
Add licence key
Apart from username and password, you will also need to add a license key to be able to access the PixelView interface. Once you receive license, pelase follow these instructions.
Notes
- The services are configured to automatically restart (
restart: always) in case of failures or system reboots.
- The
depends_on directive is used to define service dependencies, ensuring that dependent services are started before the dependent ones.
- Ensure that your system meets the resource requirements for running the services, especially for memory and CPU.
- You can customize environment variables and port mappings in the
docker-compose.yml file as needed.