Block Storage (CBS) Migrations: Evacuating Storage Devices
The Cloud Block Storage (CBS) Migration feature in Migration Manager allows you to migrate persistent block storage volumes from one storage device or pool to another.
Whether you are retiring older storage hardware, upgrading disk arrays, or balancing I/O capacity across your infrastructure, this tool automates volume validation, non-disruptive data replication, and backend retyping directly from the PixelView console.
What is a Storage Device?
In PixelView, a Storage Device represents a registered storage backend pool (such as an LVM volume group or Ceph pool) hosted on a storage node, following the canonical format:
For example:
(In the interface screenshots throughout this guide,openstack-01@lvmdriver-1#lvmdriver-1 is used as an example storage device).
All registered storage devices are cataloged in your PixelView inventory under Inventory -> Catalogue -> STORAGE DEVICES.
Evacuating a Storage Device
To evacuate a storage device and migrate all its volumes to a destination pool:
- In the Migration Manager toolbar, click the orange
+(Create Migration) button. - The Create Migration dialog will open.
Product Type Selection
Click the CBS tile (Block storage devices and volumes):
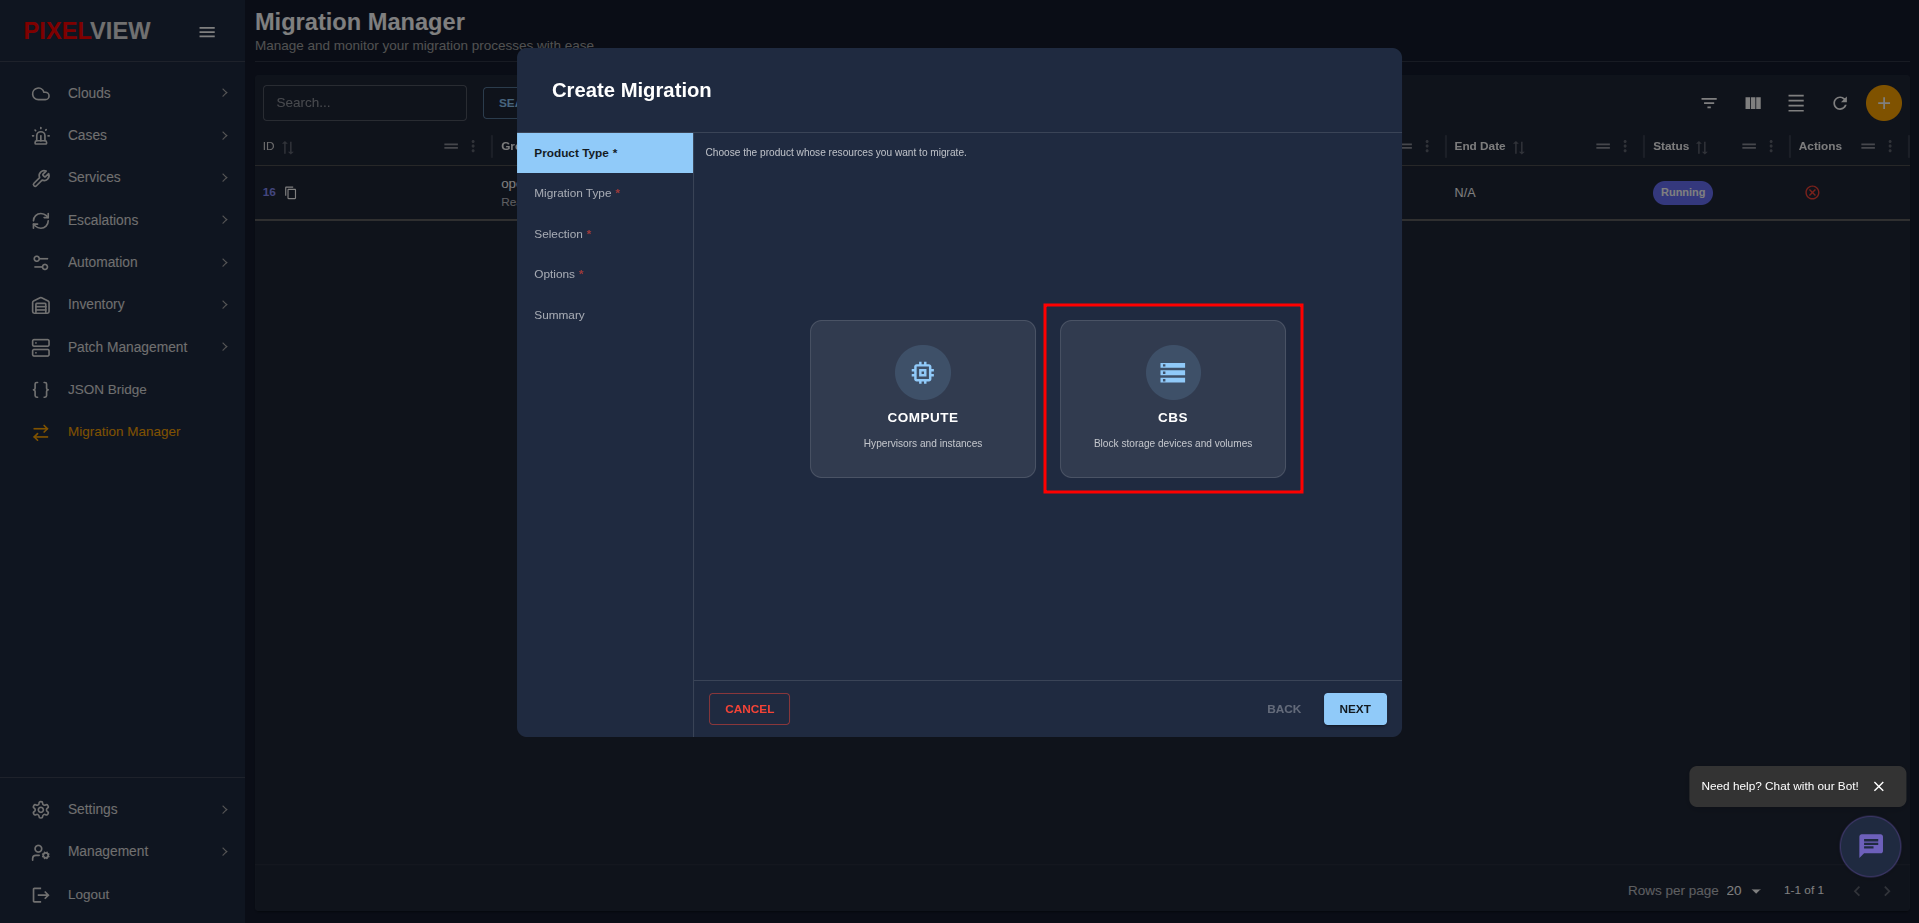
- Click NEXT.
Storage Device Migration Type
Choose the migration scope:
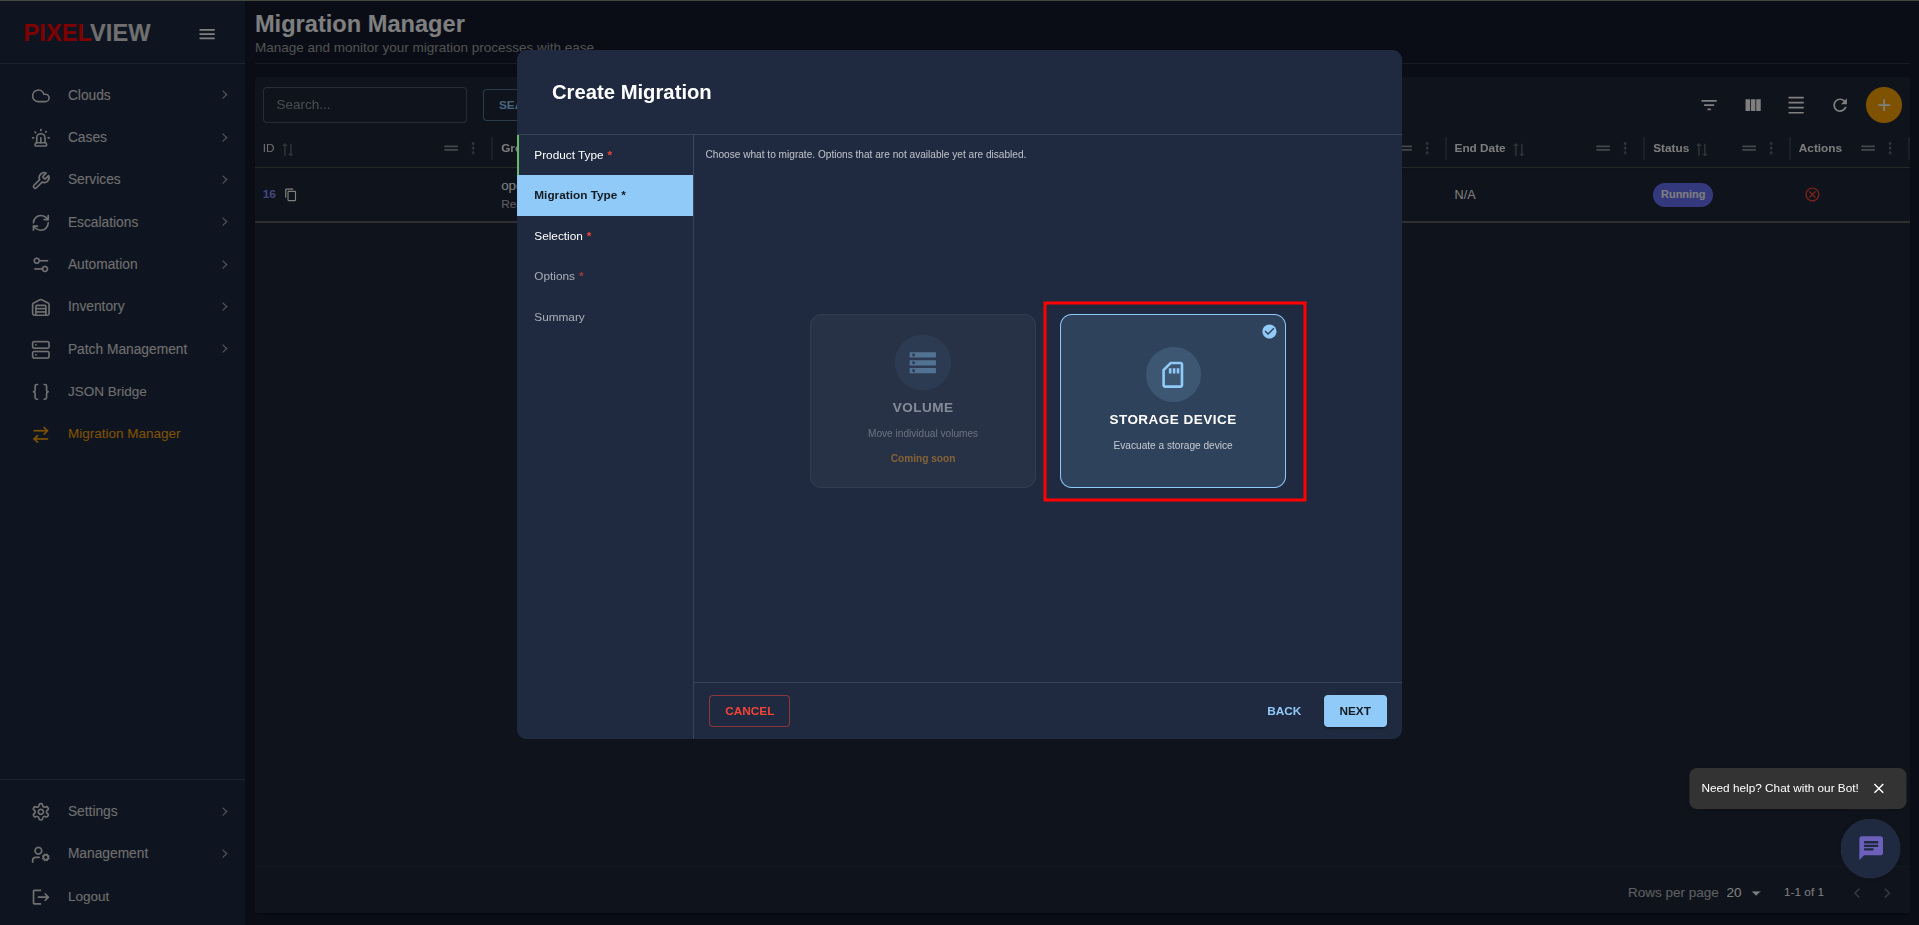
- STORAGE DEVICE: Evacuates all persistent block volumes currently stored on the selected device.
- Click NEXT.
Source & Destination Storage Pools
Select the cloud region, cell, and storage pools:
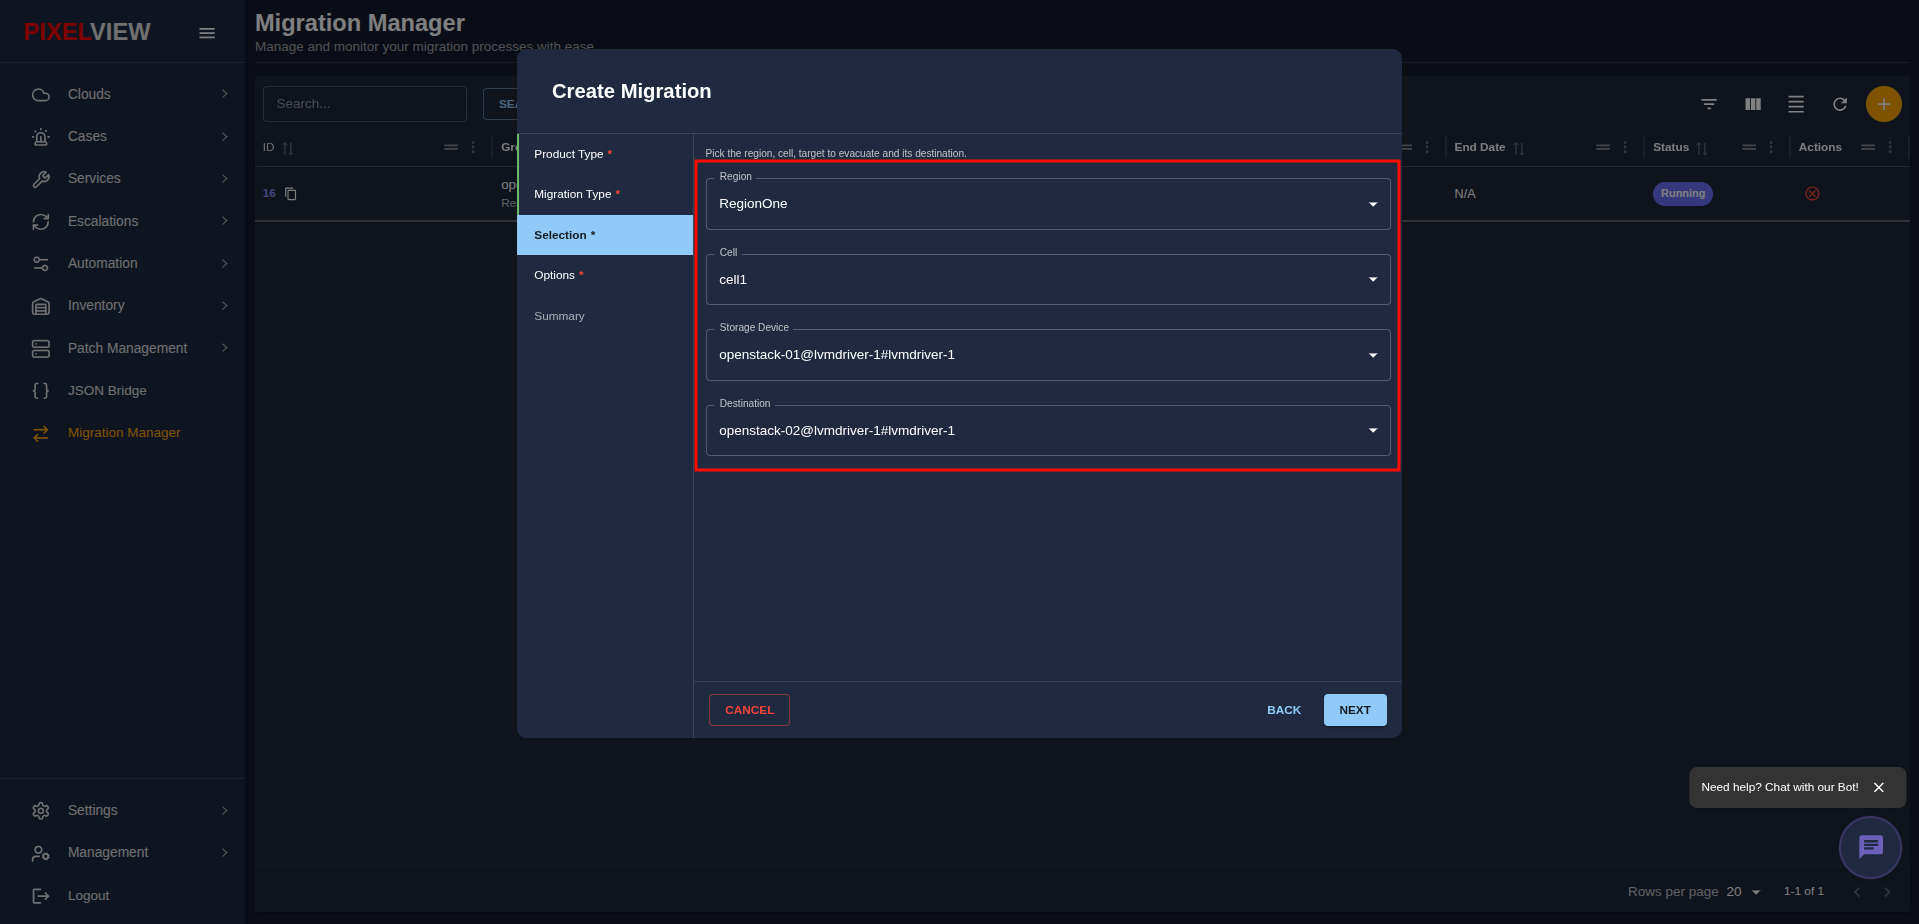
- Region: Select the cloud region (e.g.,
RegionOne). - Cell: Select the cell (e.g.,
cell1). - Storage Device: Select the source storage backend you want to evacuate (e.g.,
openstack-01@lvmdriver-1#lvmdriver-1). PixelView will discover all volumes residing on this backend. - Destination: Select the target storage device where you want the volumes to be moved (e.g.,
openstack-02@lvmdriver-1#lvmdriver-1). - Click NEXT.
Migration Options & Scheduling
Set your migration policies and timing:
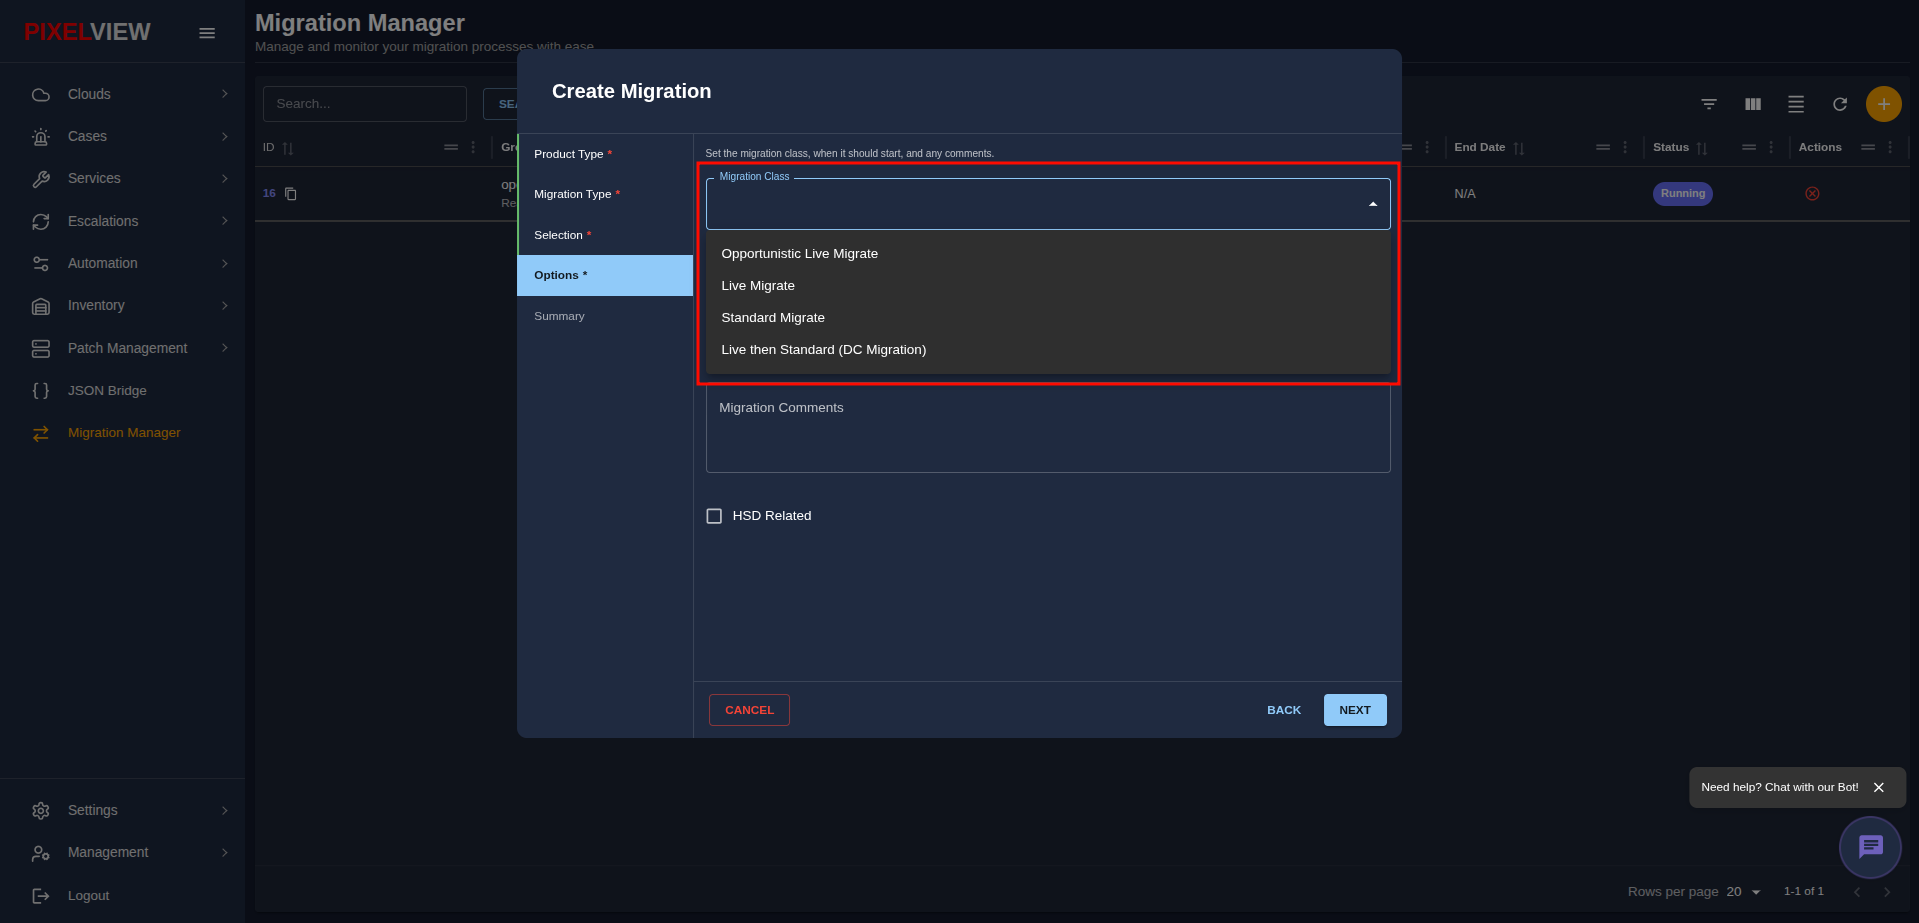
- Migration Class: Select
Live Migrateto allow non-disruptive volume retyping and replication. - Start Time:
- Now: Starts the storage evacuation immediately.
- Scheduled (UTC): Schedules the evacuation for a designated maintenance window.
- Migration Comments: Add any operational notes or tracking IDs.
- HSD Related: Check this box if the task is related to hardware maintenance.
- Click NEXT.
Review & Create
Review your selected source and destination storage devices on the summary screen, then click CREATE MIGRATION.
Tracking Storage Migrations
Once created, the migration appears in the Migration Manager dashboard:
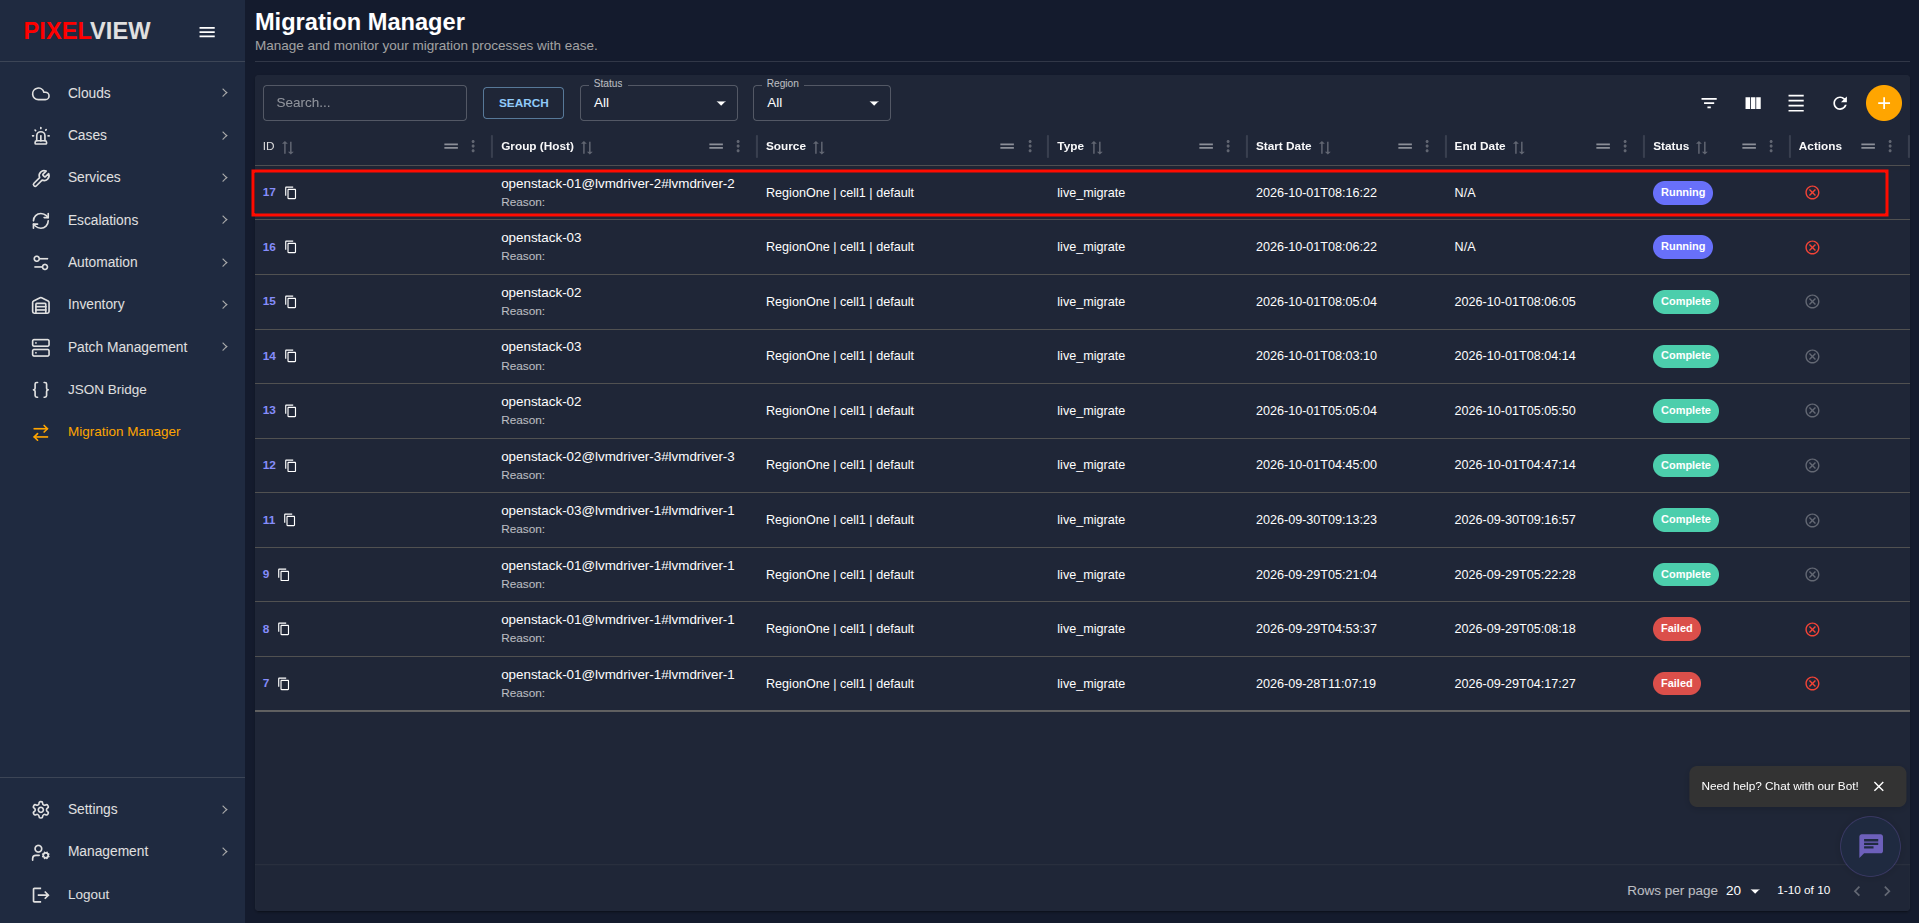
Opening the Storage Group Details
Click on the migration group row to view all volumes being evacuated:
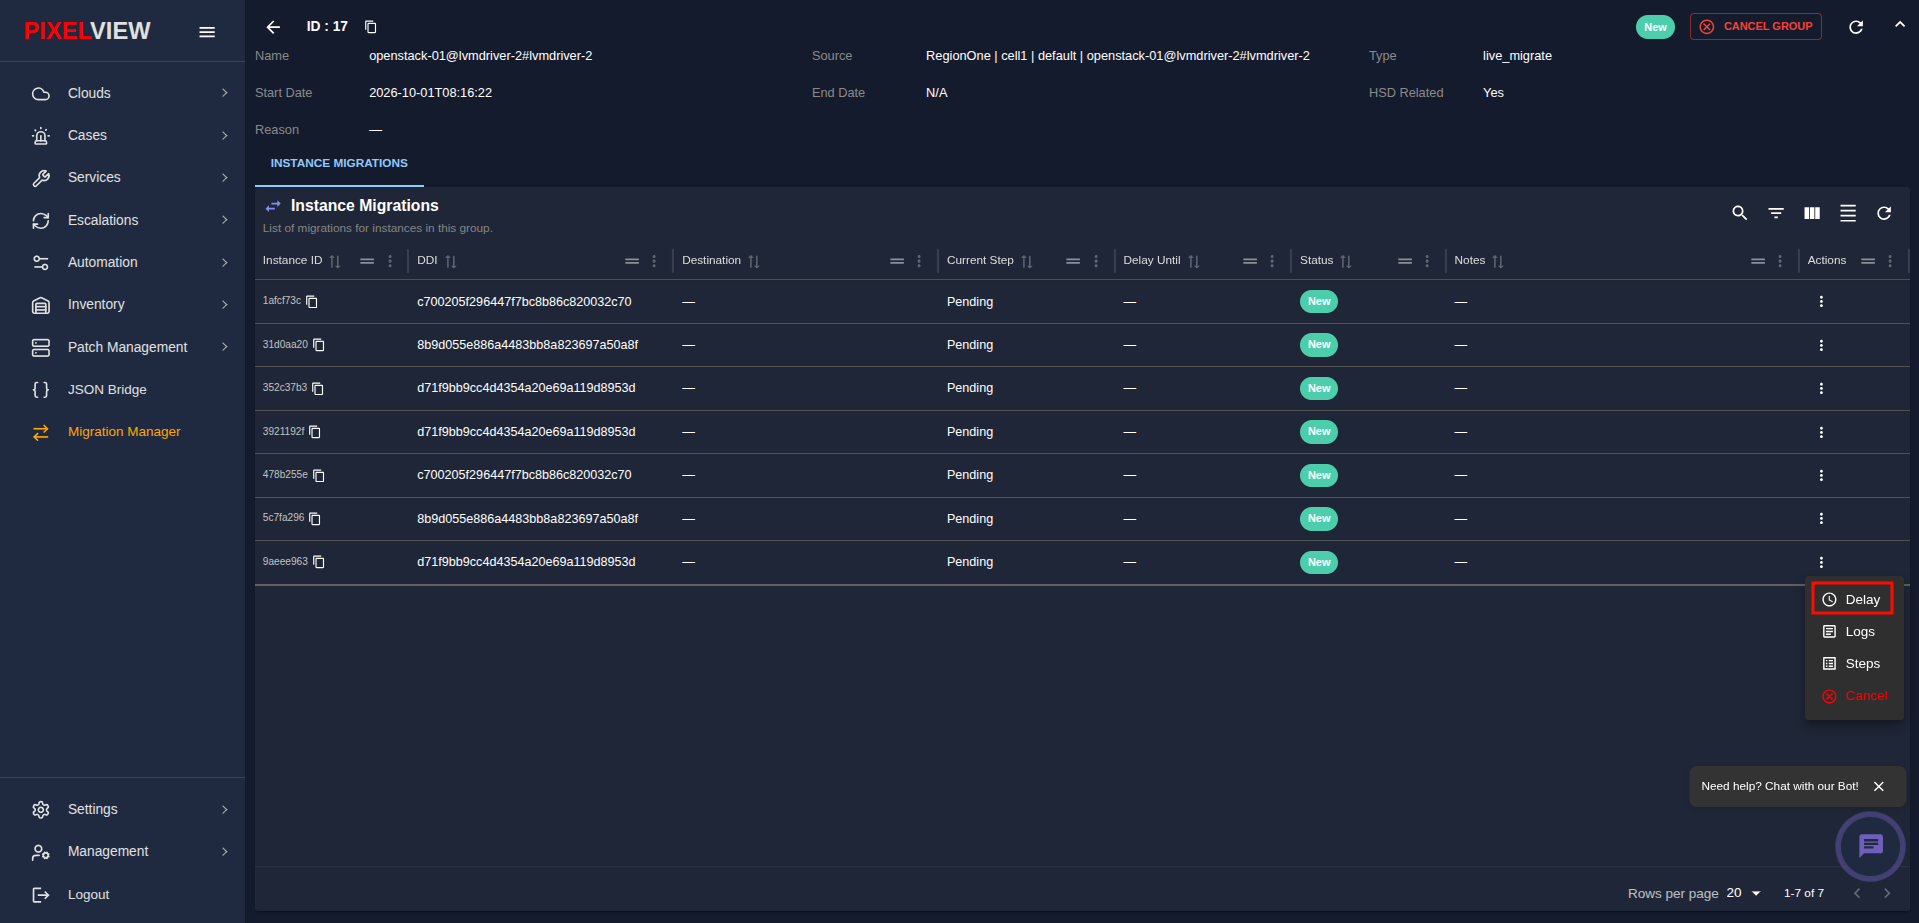
Monitoring Volume Progress
As the system processes the volumes, the table updates in real time:
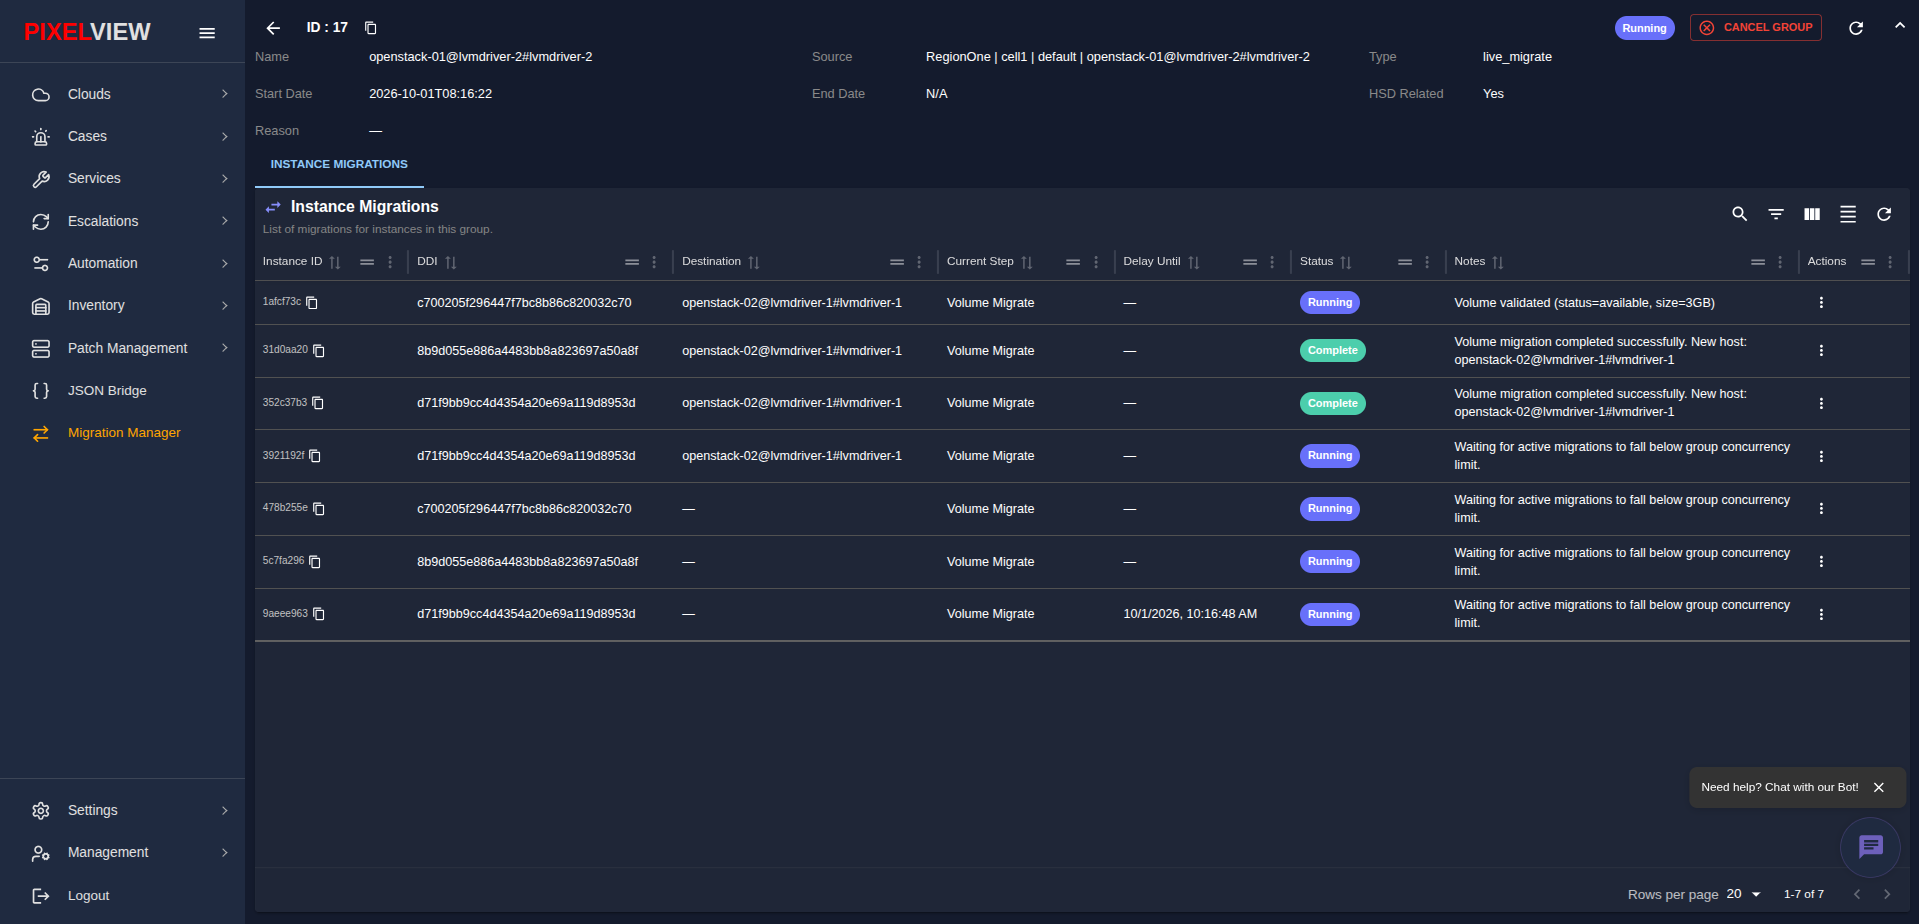
Understanding Progress Messages
Volume validated (status=available, size=3GB): The system verified that the volume is healthy and that the destination storage pool has sufficient free capacity.Waiting for active migrations to fall below group concurrency limit: The volume is queued and will begin as soon as active migrations finish. This safeguard prevents overloading your storage network.Volume migration completed successfully. New host: openstack-02@...: The volume data has been completely replicated to the destination storage pool and is active.- Active Delay Timestamp (e.g.
10/1/2026, 10:16:48 AM): The volume has been postponed to migrate at a later time.
Volume Action Controls
Each row in the volumes table provides a context action menu (...) for operational controls:
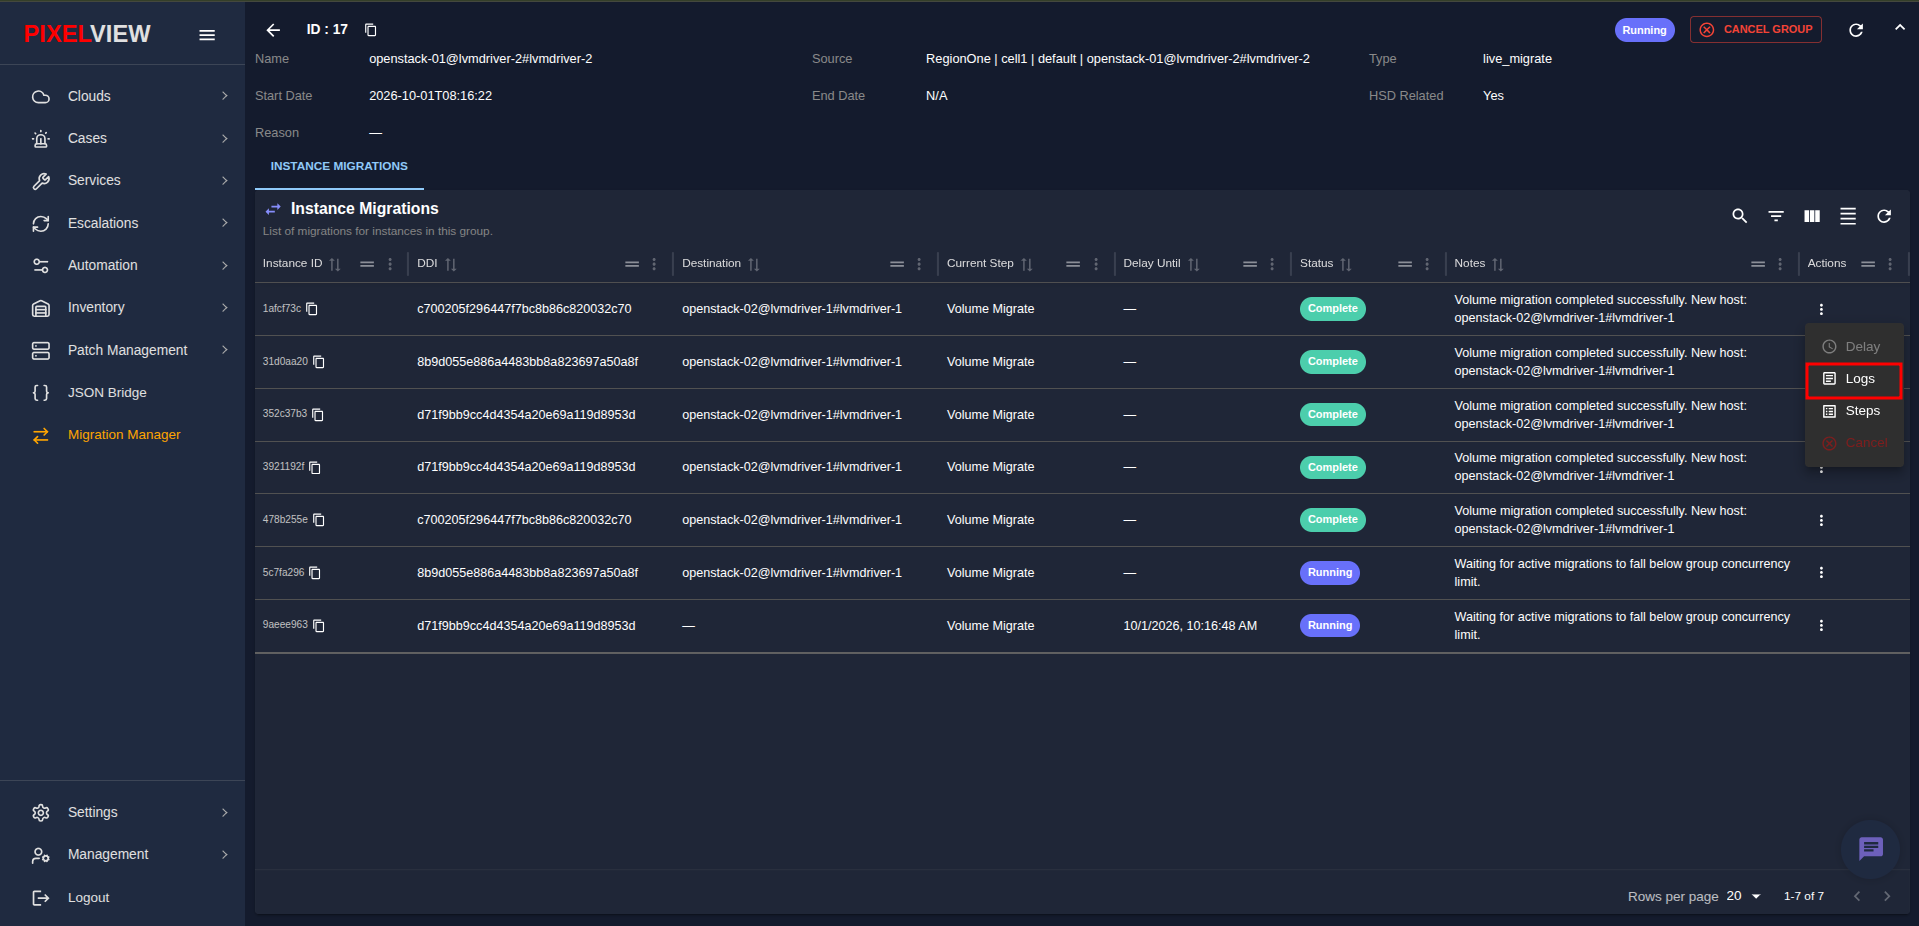
| Action | Purpose |
|---|---|
| Delay | Postpone migration of this specific volume to a later time without pausing other volumes. |
| Logs | Stream live execution logs to monitor storage driver operations and replication progress. |
| Steps | Inspect the step-by-step verification checklist for the volume. |
| Cancel | Cancel migration for this specific volume. |
Postponing (Delaying) a Volume Migration
If a particular volume should not be moved immediately (for example, if high I/O batch processing is currently occurring):
- Click the Actions (
...) menu on the volume row and select Delay. - Enter a relative time offset (
+30m,+2h,+1d) or an exact UTC date and time (YYYY-MM-DD HH:MM:SS). - Click DELAY.
Delayed Volume State
- The Delay Until column displays the active scheduled timestamp (e.g.,
10/1/2026, 10:16:48 AM). - The system skips the volume and continues processing remaining volumes on the storage device.
- Once the scheduled time arrives, the volume is automatically processed.
Resuming a Volume Immediately
- To run a delayed volume right away, click Actions (
...) → Delay, then click RESUME NOW.
Viewing Live Volume Execution Logs
PixelView provides real-time streaming logs for block storage operations:
- Click the Actions (
...) menu on the volume row and select Logs (as shown highlighted above). - The Instance Migration Logs dialog opens, displaying live telemetry:
- Volume attachment status checks.
- Backend storage driver communications.
- Asynchronous block replication progress.
- Destination pool verification.
Checking Detailed Steps for a Volume
To view the execution checklist for any specific volume:
- Click the Actions (
...) menu on the volume row. - Select Steps.
- The Migration Steps window opens:
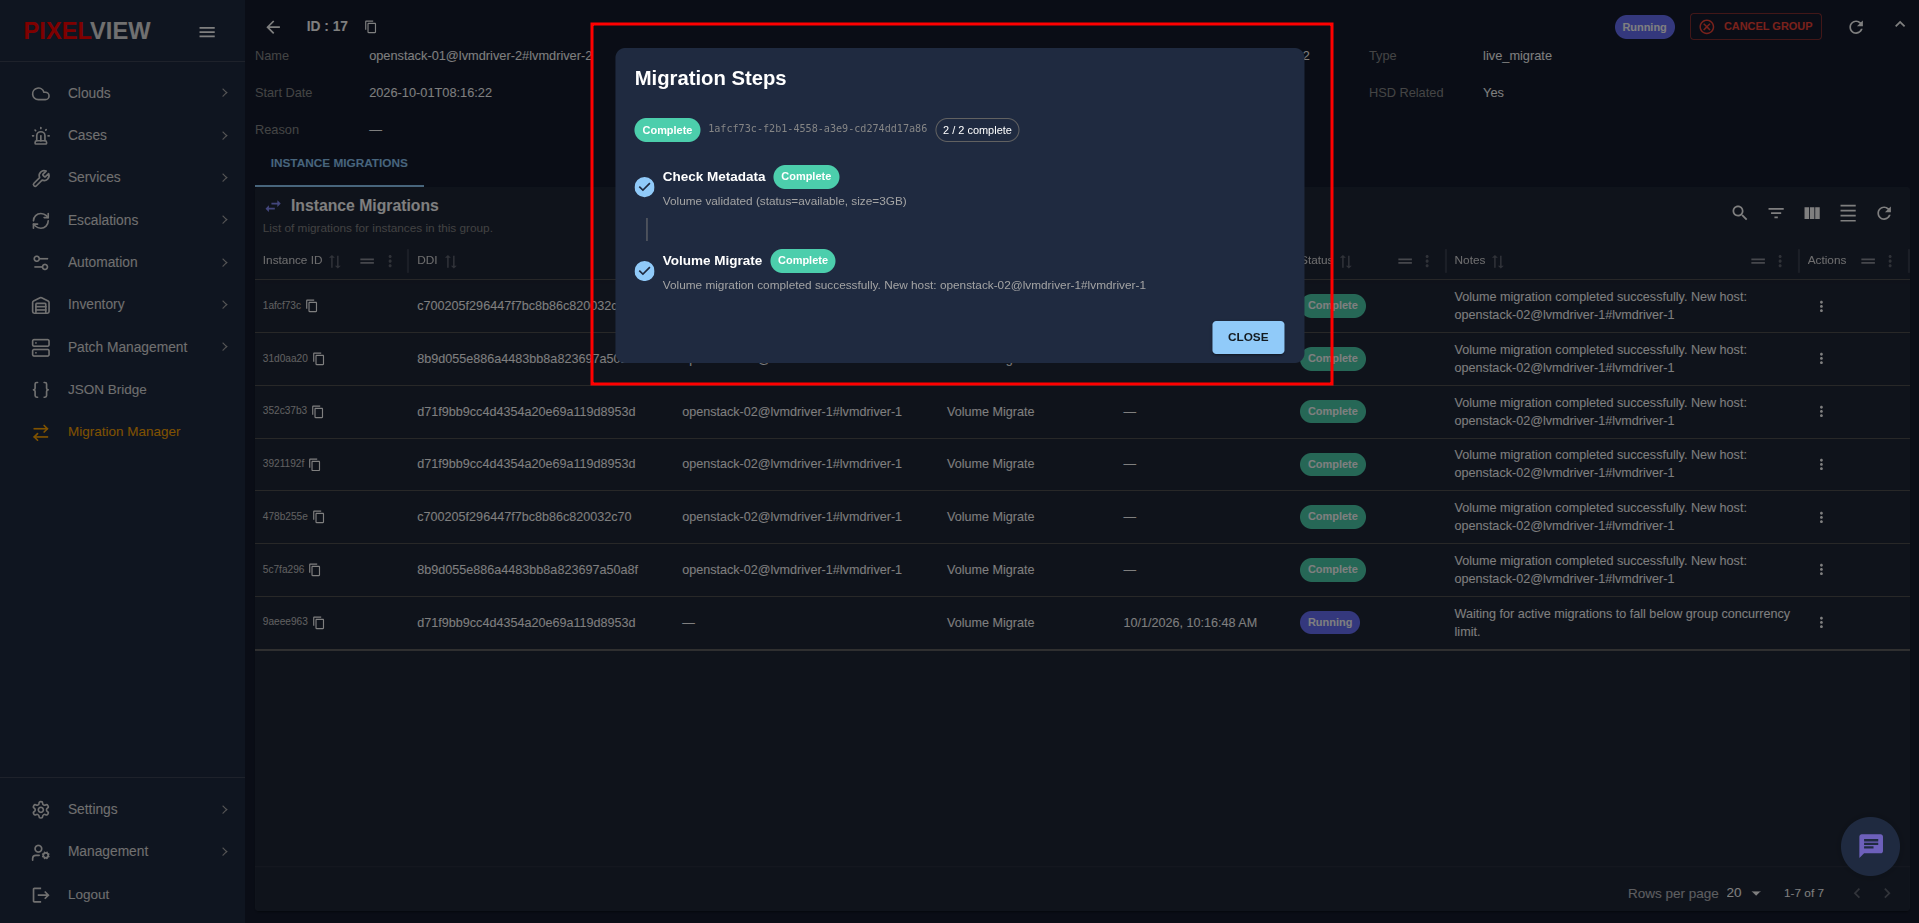
What the Steps Mean
- Check Metadata: Confirms the volume is in a valid state (
availableorin-use), checks disk size, and verifies that the destination storage pool is online and has space. - Volume Migrate: Safely copies volume data to the new storage backend pool, updates volume location attributes, and verifies data integrity.
Cancelling Storage Migrations
- Cancel a Single Volume: Click Actions (
...) on any pending volume row and select Cancel. - Cancel the Entire Group: Click the red CANCEL GROUP button in the header toolbar of the group details page. Unstarted volumes are halted immediately, while in-flight volume copies finish safely.
Storage Troubleshooting & Tips
- Why is a volume waiting for concurrency limit?: PixelView limits concurrent volume migrations to protect storage array I/O and network bandwidth. Queued volumes begin automatically as active copies conclude.
- What if volume migration takes a long time?: Large volumes (hundreds of gigabytes or terabytes) require time for initial block replication. You can click Logs to check live transfer status.
- What if a volume fails pre-checks?: Check the Logs dialog to see the error message. Common causes include insufficient free space in the target storage pool or an offline storage driver.
Related Storage Guides
- Cinder (CBS) Setup & Troubleshooting Guide — Step-by-step guide for provisioning Cinder backends, tuning Libvirt
remember_owner = 0for live disk swaps, cleaning up stuck volume locks, and multi-region database setup.