Compute Migrations: Evacuating Hypervisors
The Compute Migration feature in Migration Manager lets you evacuate all virtual machine instances running on a compute hypervisor and safely move them to another host with minimal or zero downtime.
This guide walks you through scheduling a host evacuation, choosing migration settings, monitoring instances as they move, postponing workloads, viewing live execution logs, and verifying step completion.
Evacuating a Compute Hypervisor
To evacuate a compute host:
- In the upper-right toolbar of the Migration Manager page, click the orange
+(Create Migration) button. - The Create Migration dialog will open.
Product Type Selection
In the dialog, click COMPUTE to manage hypervisors and virtual machine instances:
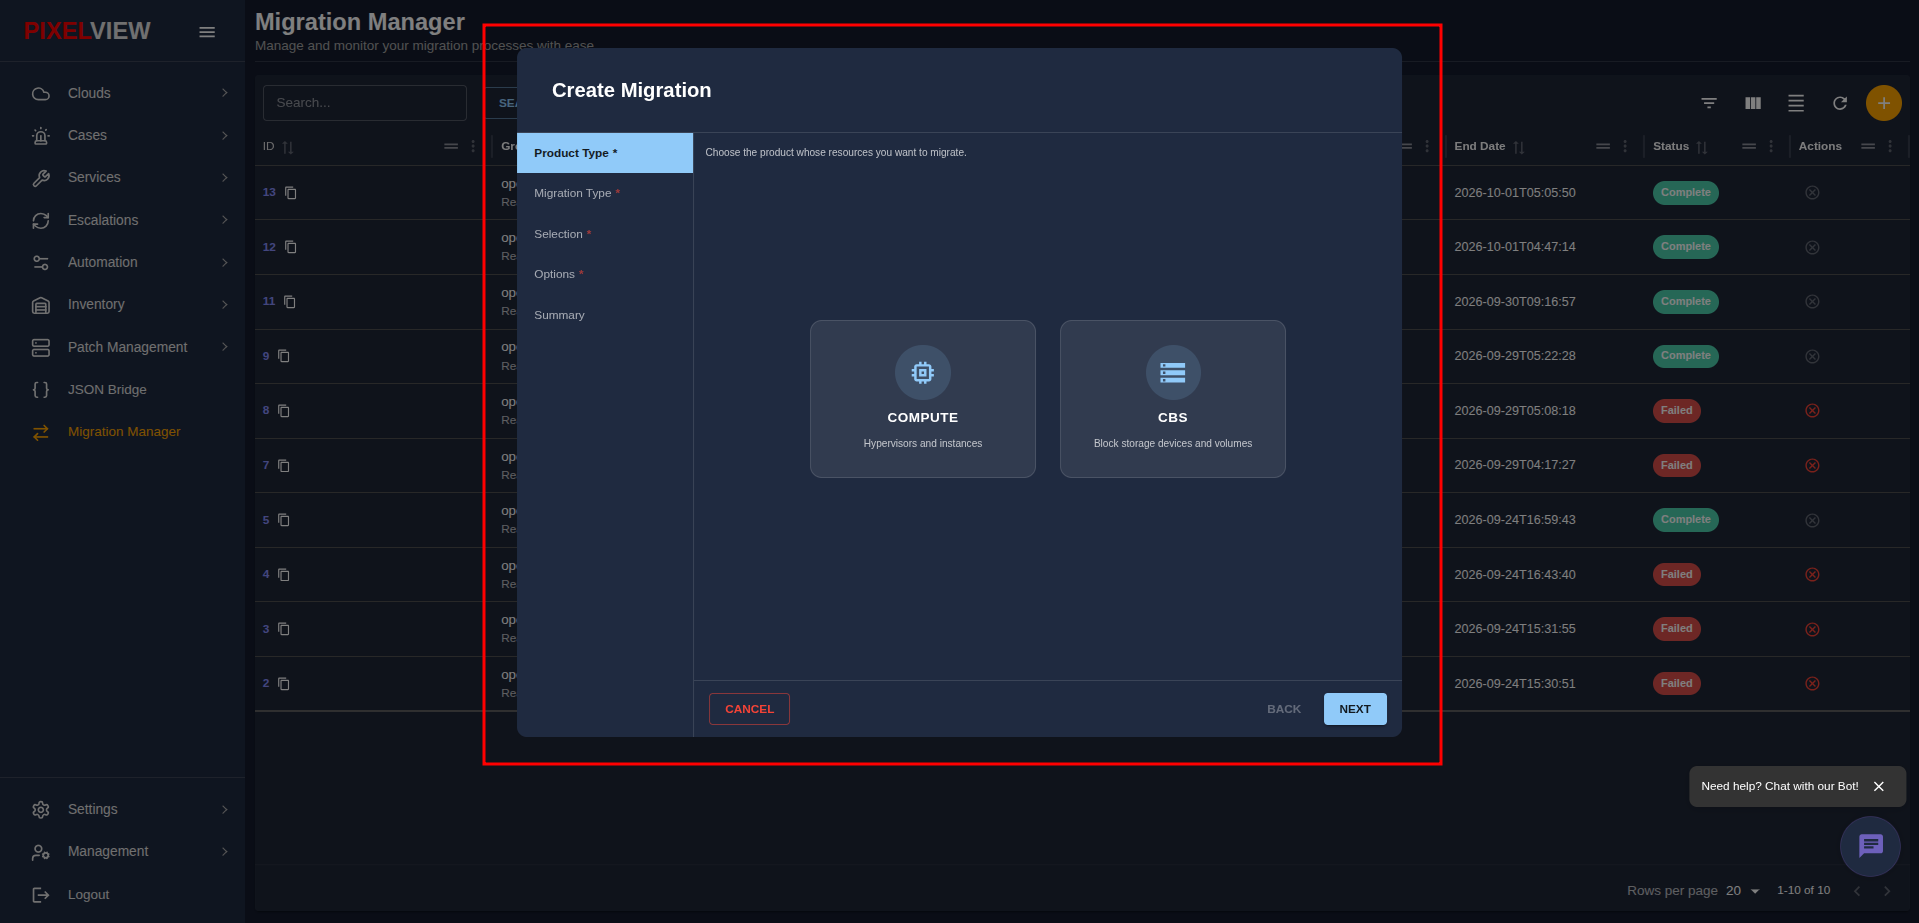
- Click NEXT.
Migration Type Selection
Choose the scope of your migration:
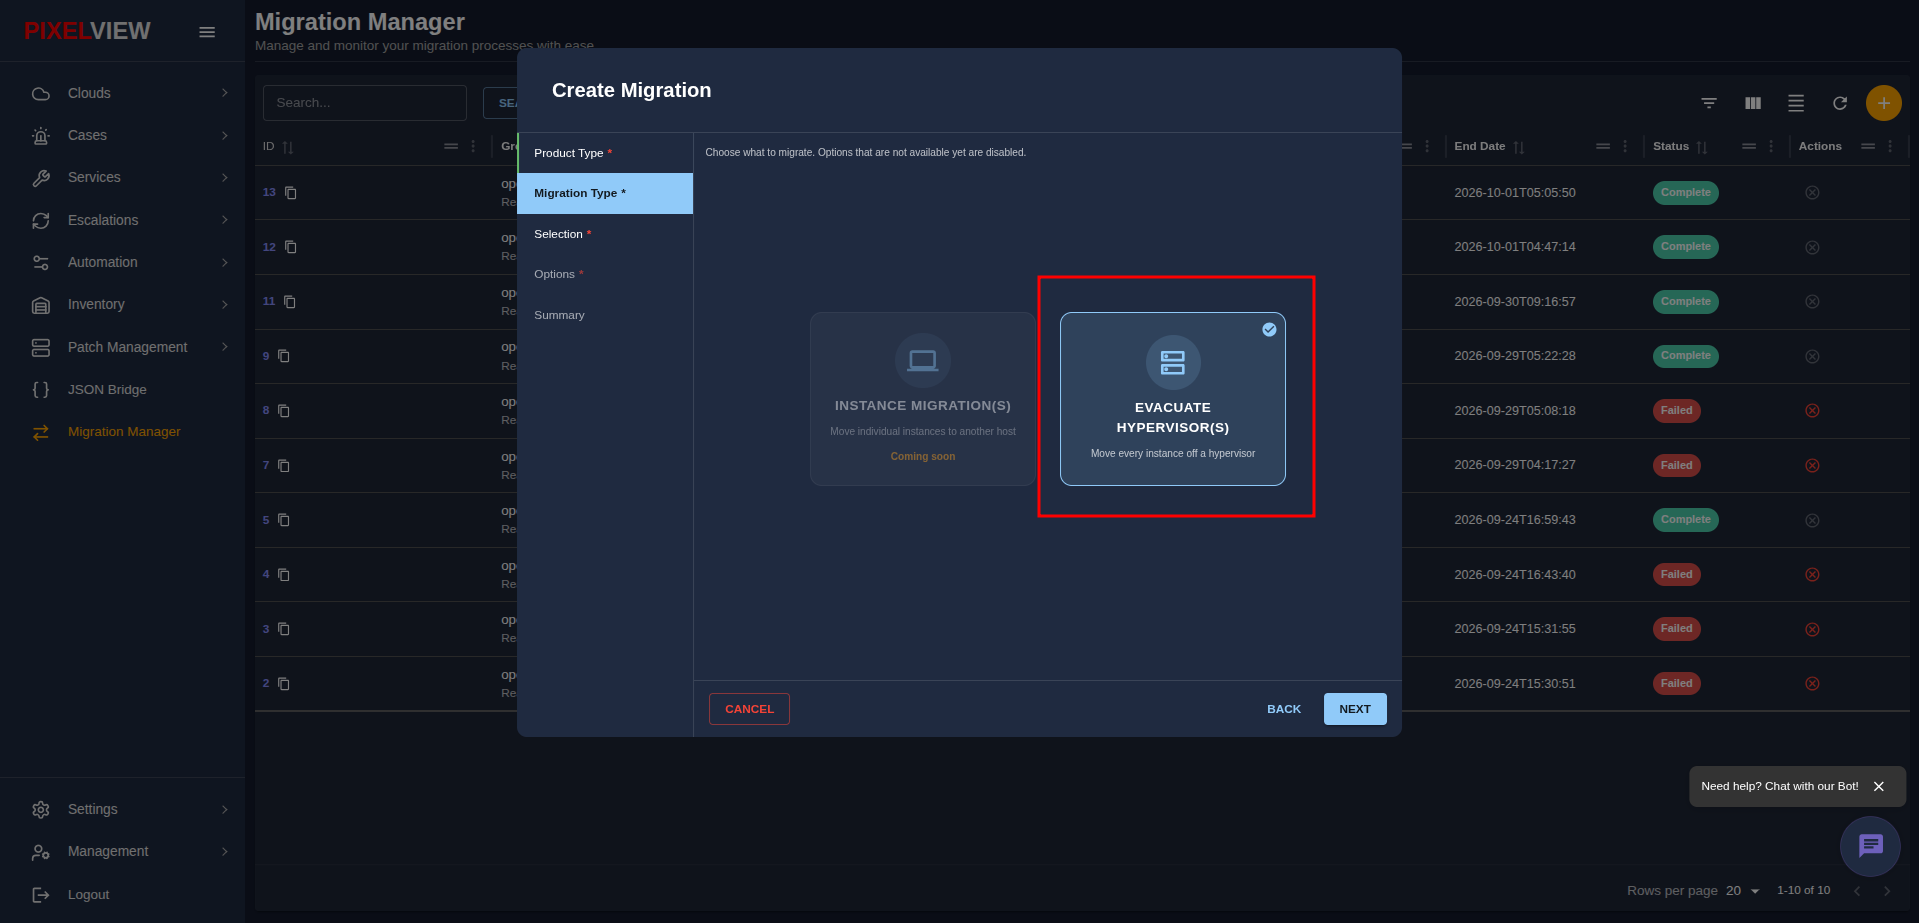
- EVACUATE HYPERVISOR(S): Select this option to evacuate all instances currently residing on the source host.
- Click NEXT.
Source & Destination Selection
Select the location and the physical servers involved in the migration:
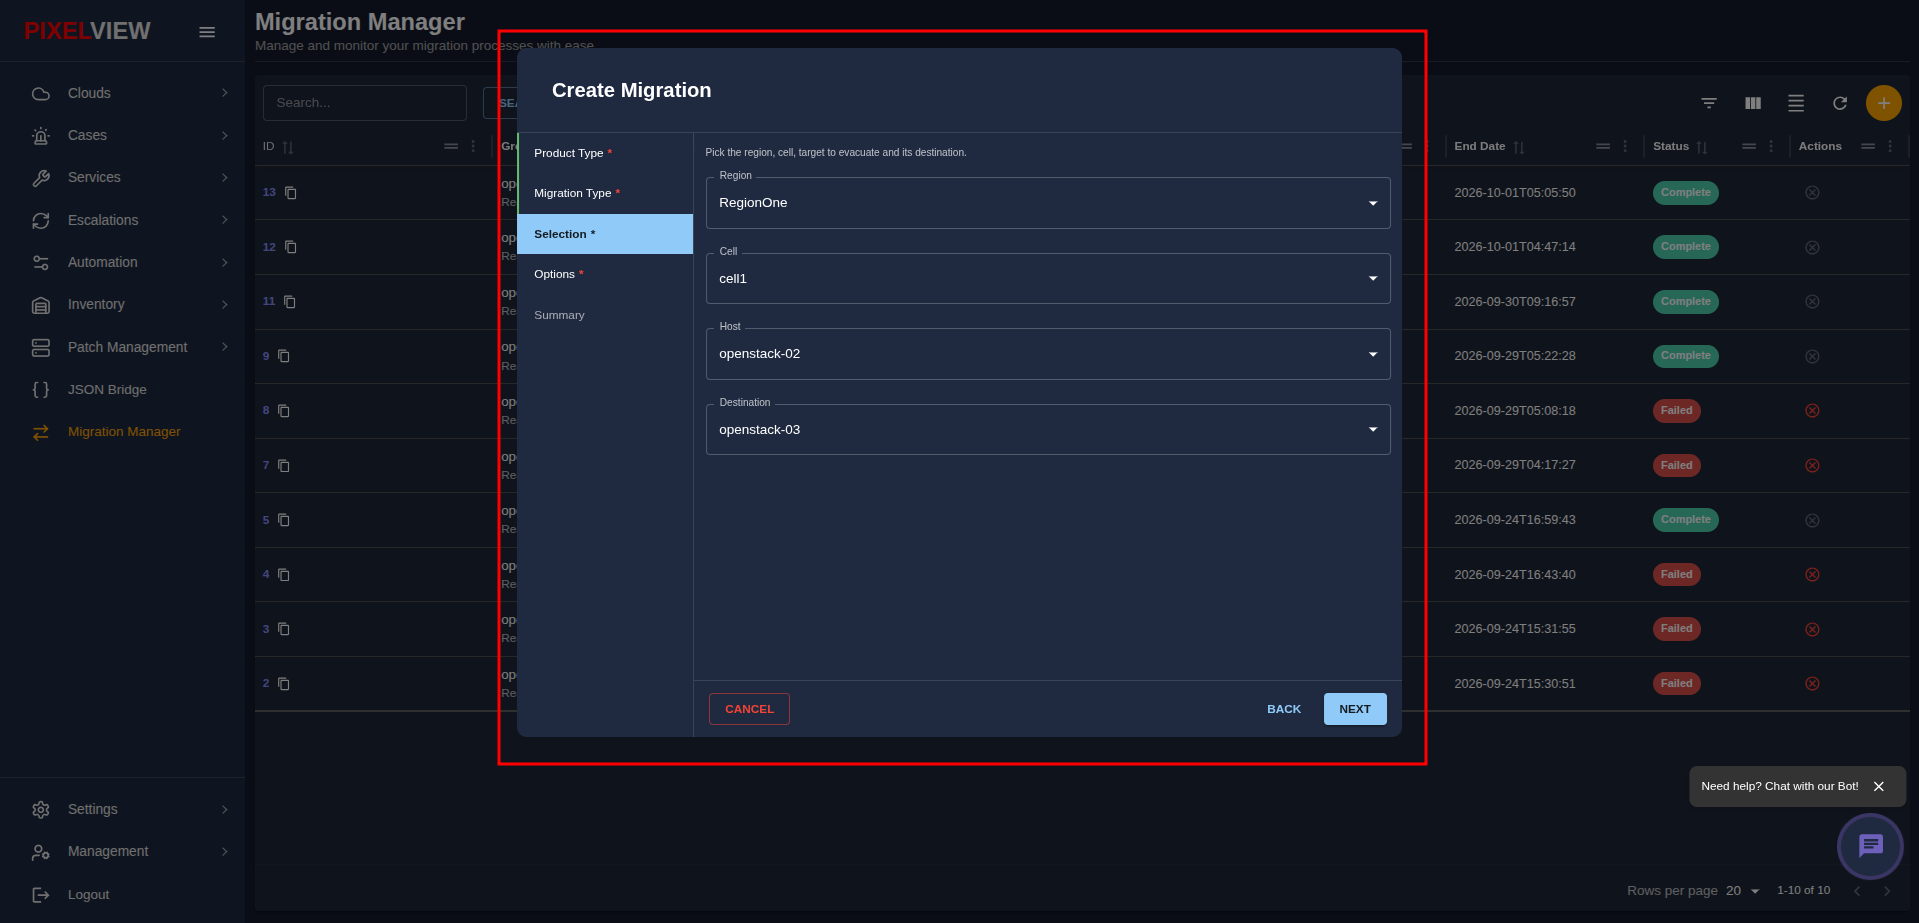
- Region: Select your cloud region (e.g.,
RegionOnein the screenshot, or your target region). - Cell: Select the compute cell (e.g.,
cell1in the screenshot, or your cell name). - Host: Select the source hypervisor you need to evacuate (e.g.,
openstack-02in the screenshot, or your source server). PixelView automatically queries the host and finds all virtual machines running on it. - Destination: Select the target hypervisor where you want the instances to land (e.g.,
openstack-03in the screenshot, or your destination server). - Click NEXT.
Only Healthy Hosts are Listed
The Host and Destination dropdowns automatically list active, reachable compute nodes discovered from your cloud environment.
Migration Options & Scheduling
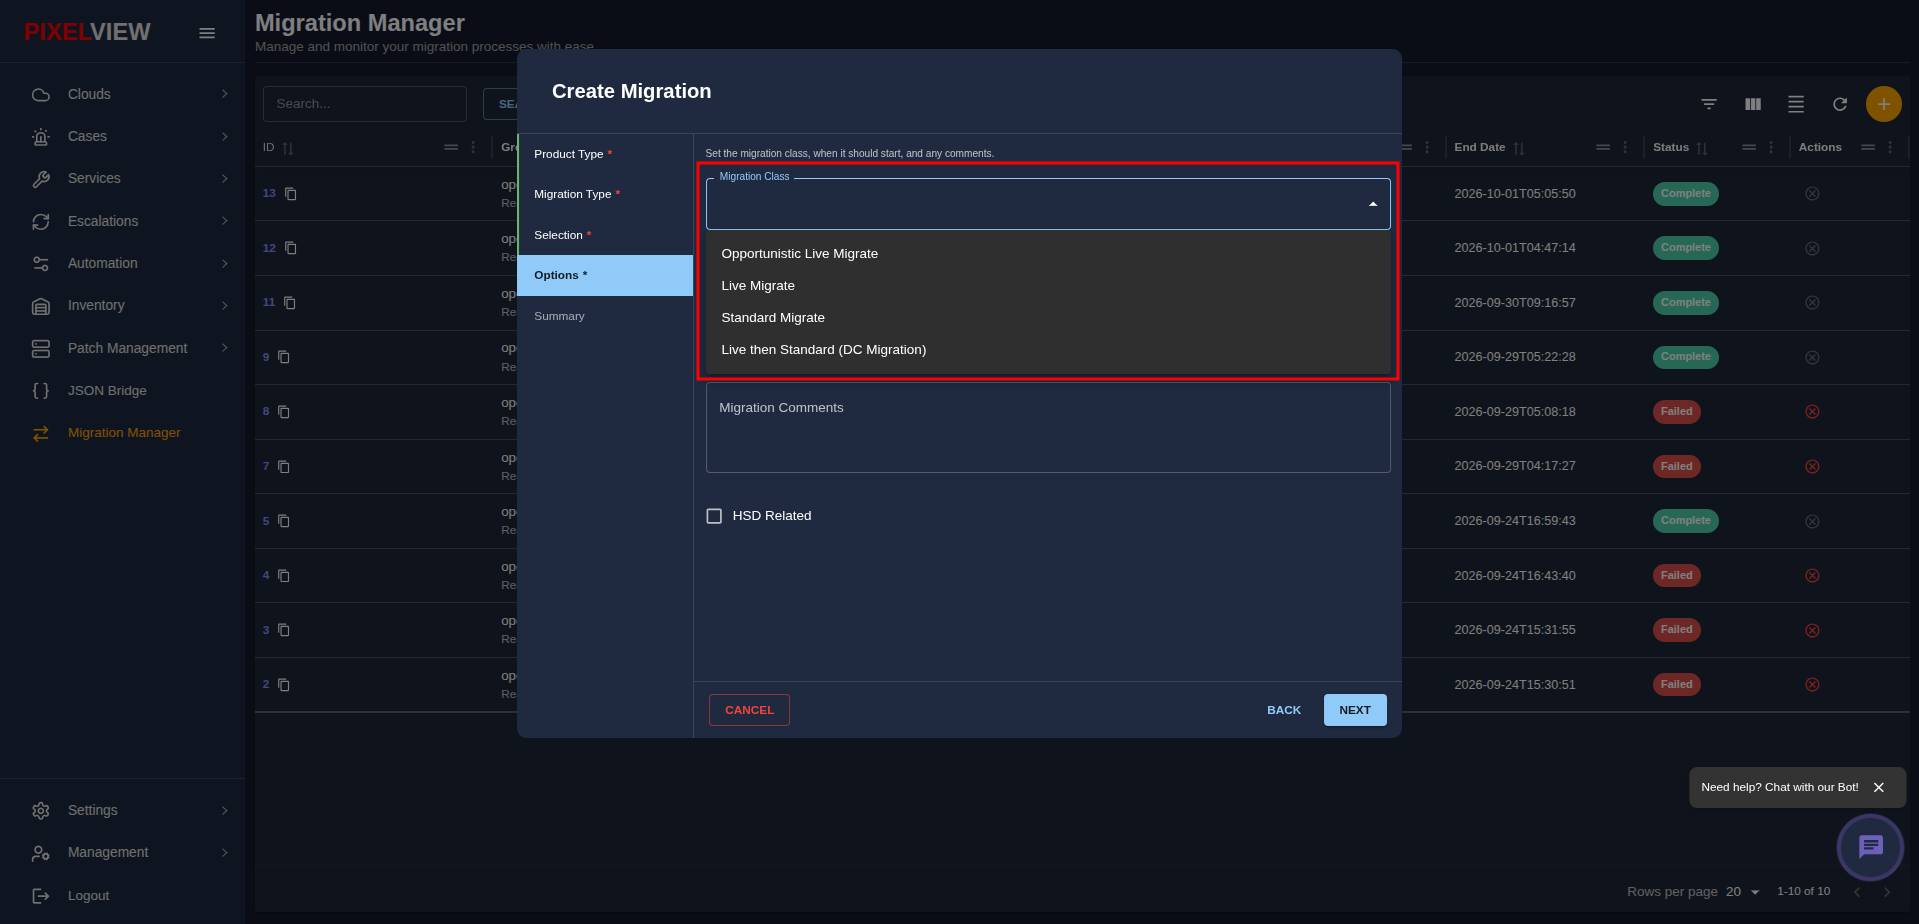
Choose how the virtual machines should be migrated and when execution should start:
Choosing the Right Migration Class
| Migration Class | How It Works | Recommended For |
|---|---|---|
Live Migrate |
The virtual machine continues running while its memory, CPU state, and network connections are transferred to the destination host. Zero downtime. | Production applications, customer-facing services, and databases that cannot be powered off. |
Opportunistic Live Migrate |
Attempts a live migration first. If a specific VM cannot be live-migrated (e.g. due to hardware constraints), the system intelligently adapts. | Routine fleet maintenance where you want maximum uptime without getting blocked by non-live-capable VMs. |
Standard Migrate |
A cold migration. The instance is powered off, its disk and state are moved to the target host, and it is powered back on. | Test/development VMs, stopped instances, or instances that do not require continuous uptime. |
Live then Standard (DC Migration) |
Attempts live migration first; if it encounters incompatibility between different server architectures or networks, it automatically falls back to cold migration. | Moving workloads across different server generations or separate network pods. |
Scheduling & Additional Details
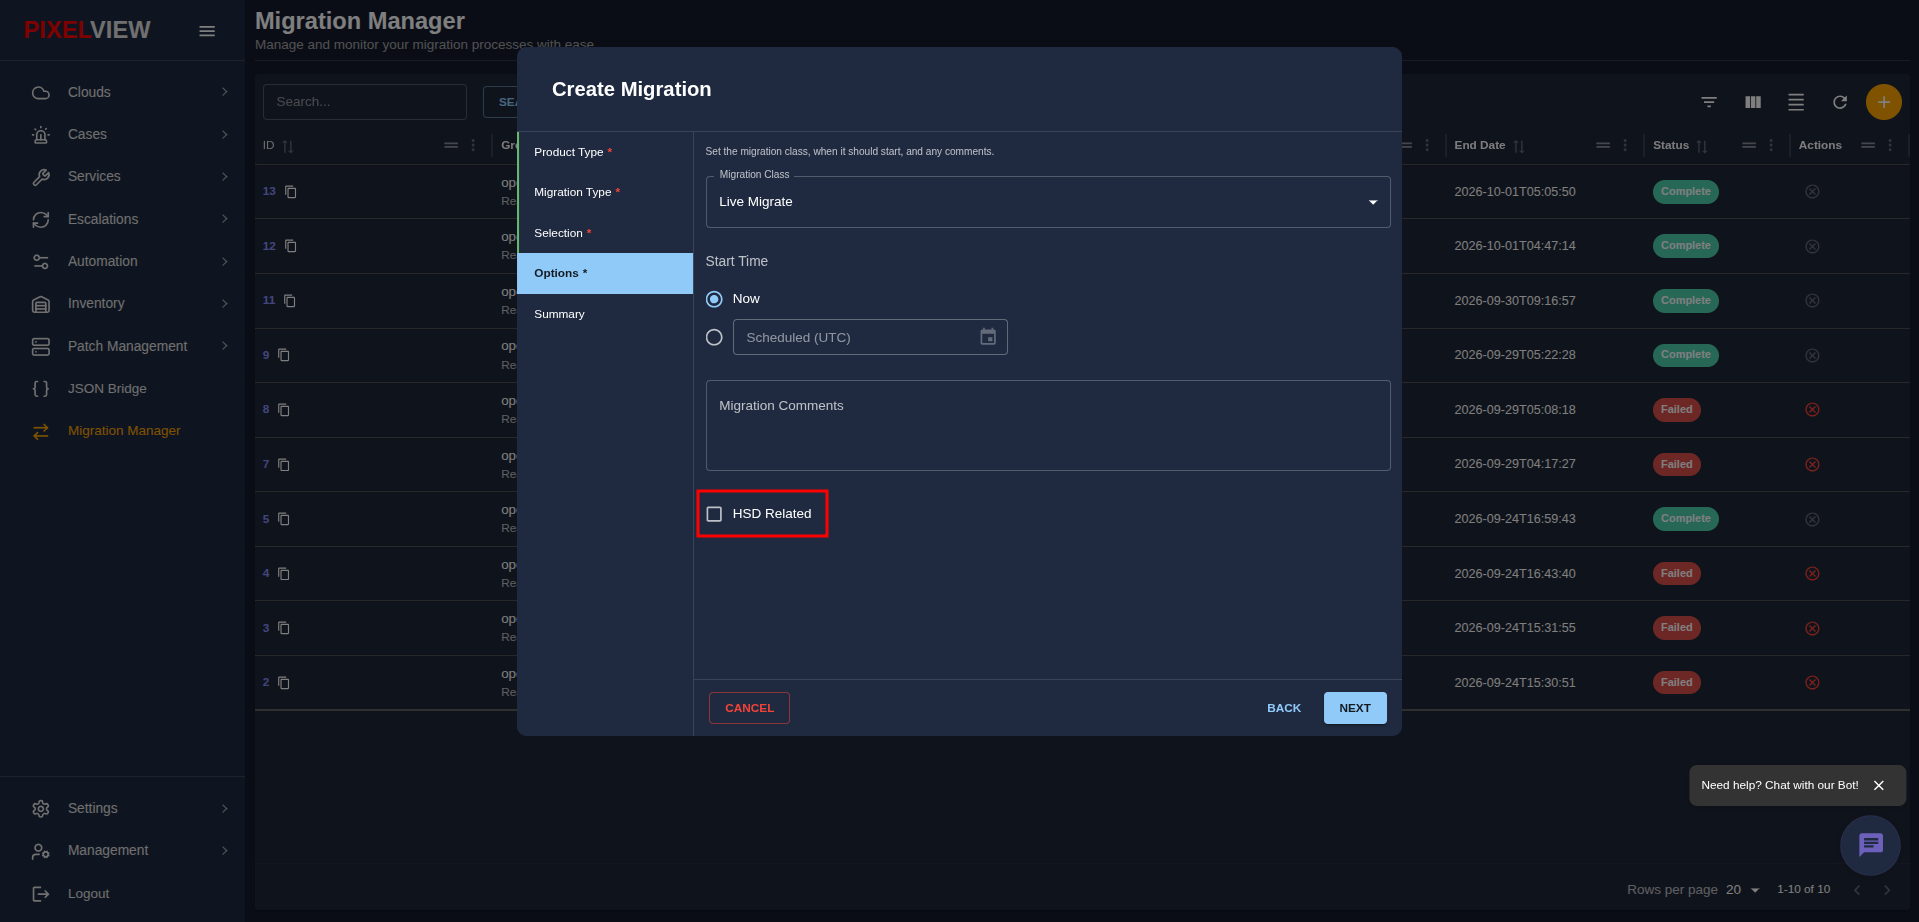
- Start Time:
- Now: Starts the evacuation immediately.
- Scheduled (UTC): Pick a specific date and time to run the evacuation during a planned maintenance window.
- Migration Comments: Add optional notes (e.g.,
Scheduled CPU upgrade - Ticket #1042). - HSD Related: Check this box if the evacuation is related to a Hardware Support Delivery (HSD) maintenance event.
- Click NEXT.
Review Summary & Create
Check your configuration on the summary screen:
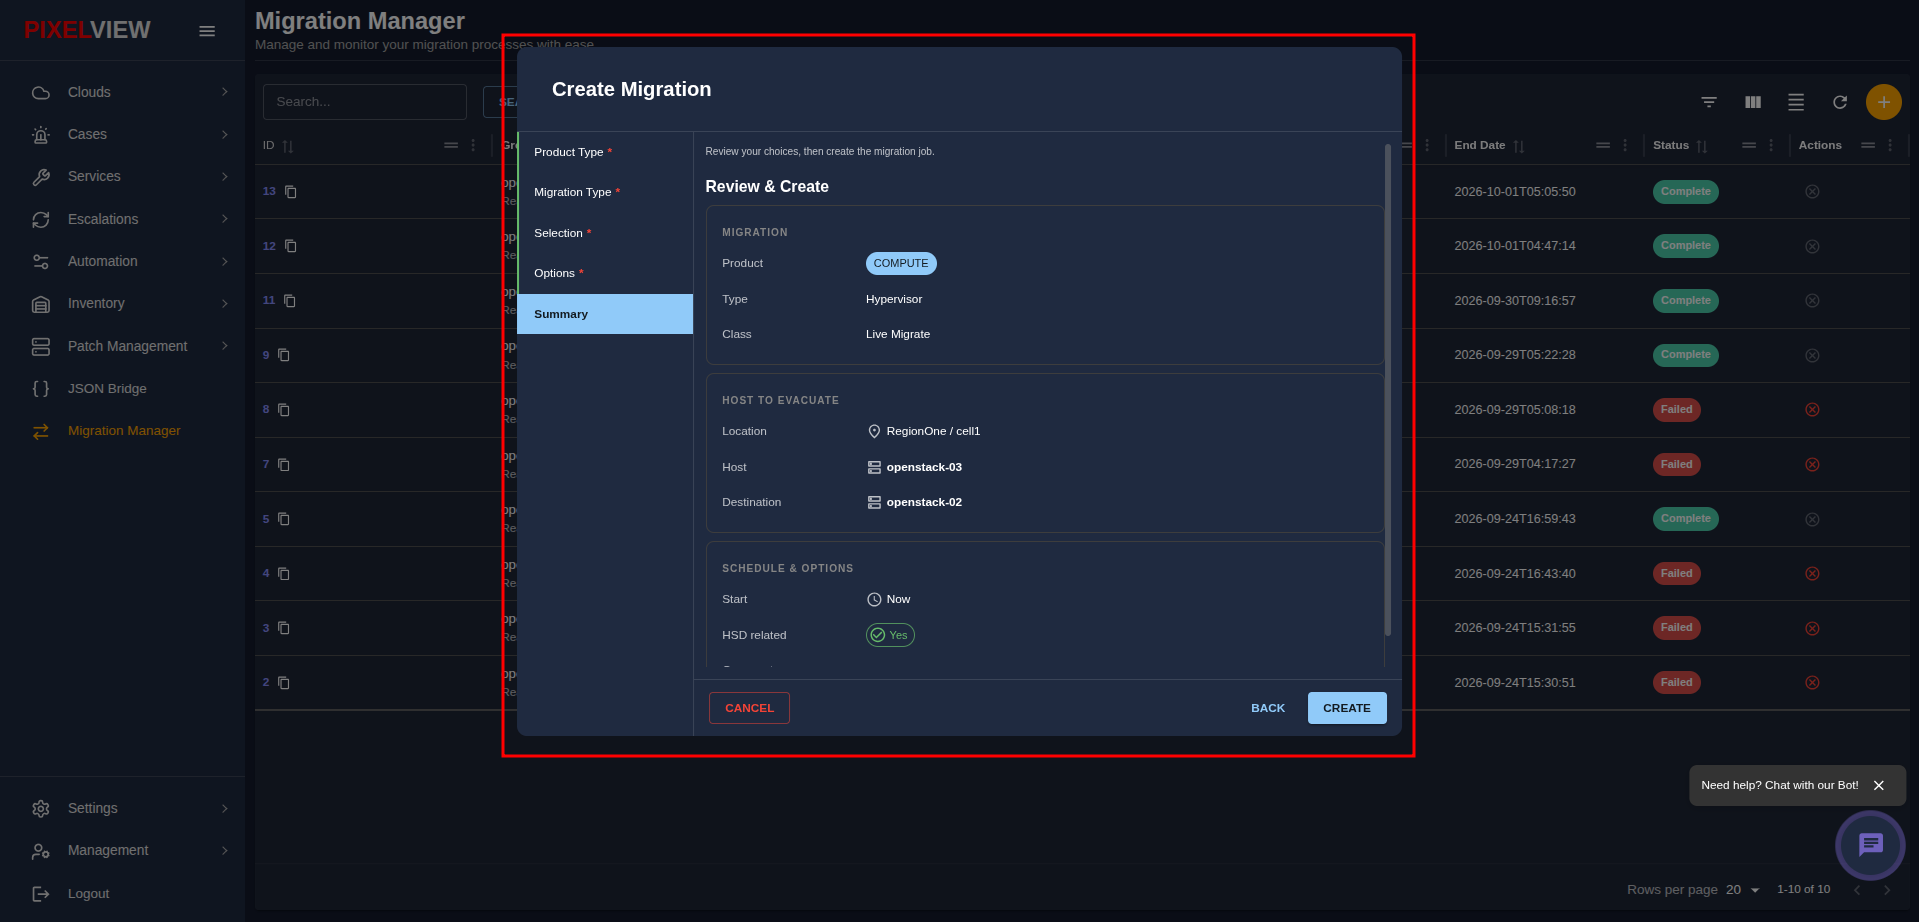
- Confirm the Source Host, Destination Host, Migration Class, and Start Time.
- Click CREATE MIGRATION.
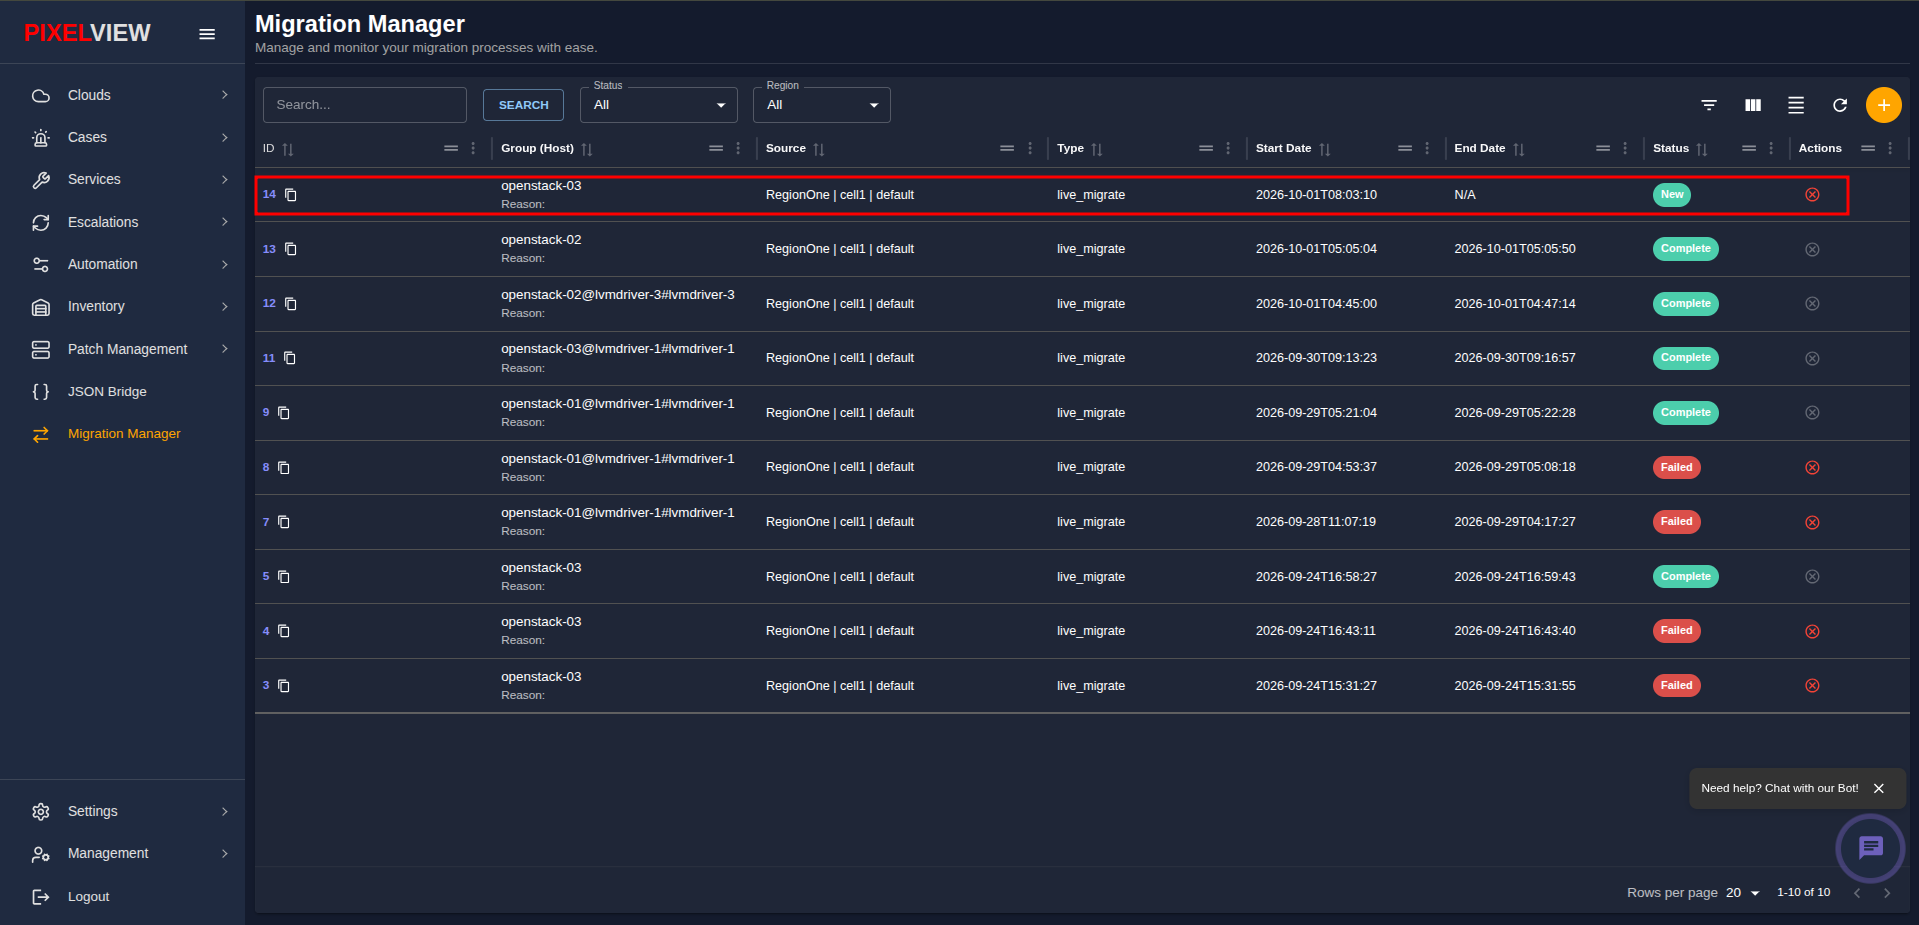
Tracking Migration Progress
After creating the migration, your new group appears in the Migration Manager table with status New:
Opening the Group Detail View
Click on the migration group row to open its detailed tracking page:
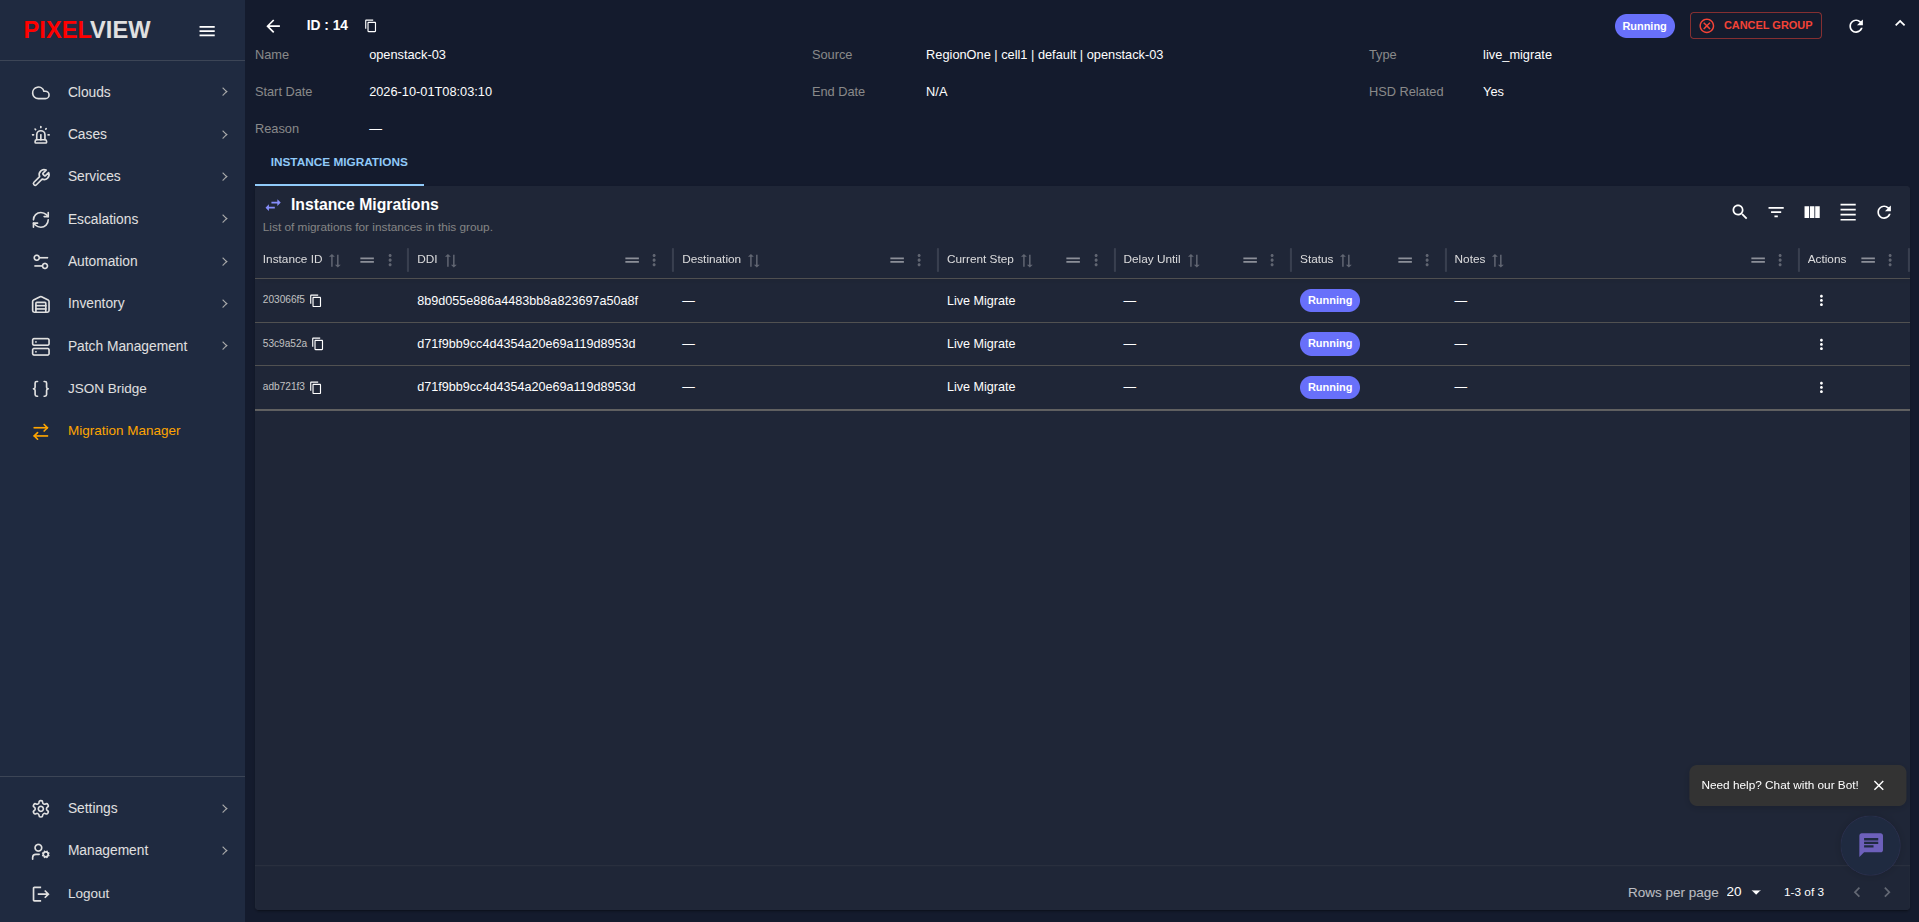
Header Information
- Name: The host being evacuated (
openstack-03). - Start Date: When the migration started.
- Status Badge: Shows whether the group is
New,Running, orComplete. - CANCEL GROUP Button: Allows you to stop all remaining unmigrated instances if needed.
Monitoring Instances in the Group
The Instance Migrations table lists every virtual machine found on the source host:
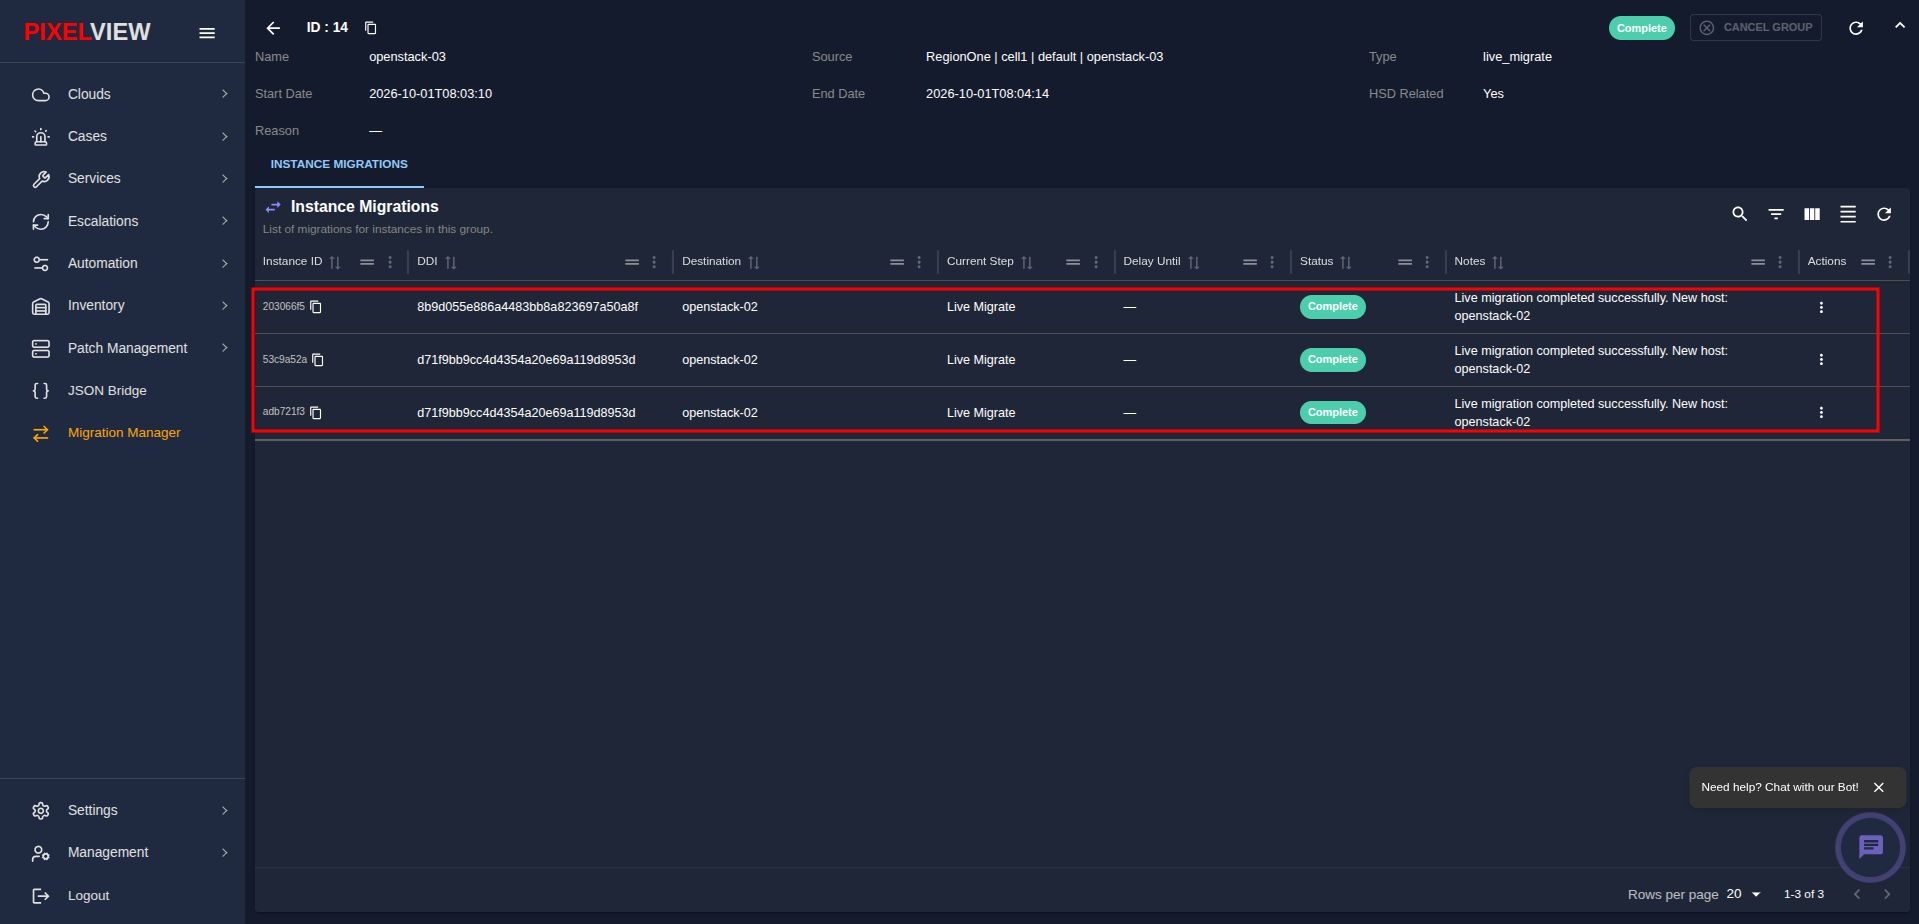
Table Columns
- Instance ID: The unique identifier of the virtual machine (with a button to copy it).
- DDI: The customer or tenant account identifier.
- Destination: The target host where the VM is moving (
openstack-02). - Current Step: What the system is currently doing (e.g.,
Pending,Live Migrate). - Delay Until: Displays a timestamp if this VM was postponed to run later.
- Status:
New: Waiting to be processed.Running: Currently performing validation or data transfer.Complete: Successfully running on the new host.Failed: Encountered an issue.- Notes: Operational messages explaining current progress (e.g.,
Live migration completed successfully. New host: openstack-02). - Actions (
...): Menu to delay, view logs, view steps, or cancel this instance.
Automatic Concurrency Protection
To protect server network performance, PixelView processes a set number of instances at a time. Other instances will show Waiting for active migrations to fall below group concurrency limit and will automatically begin as earlier ones finish.
Instance Action Controls
Each instance row features a context action menu (...) providing real-time operational controls:
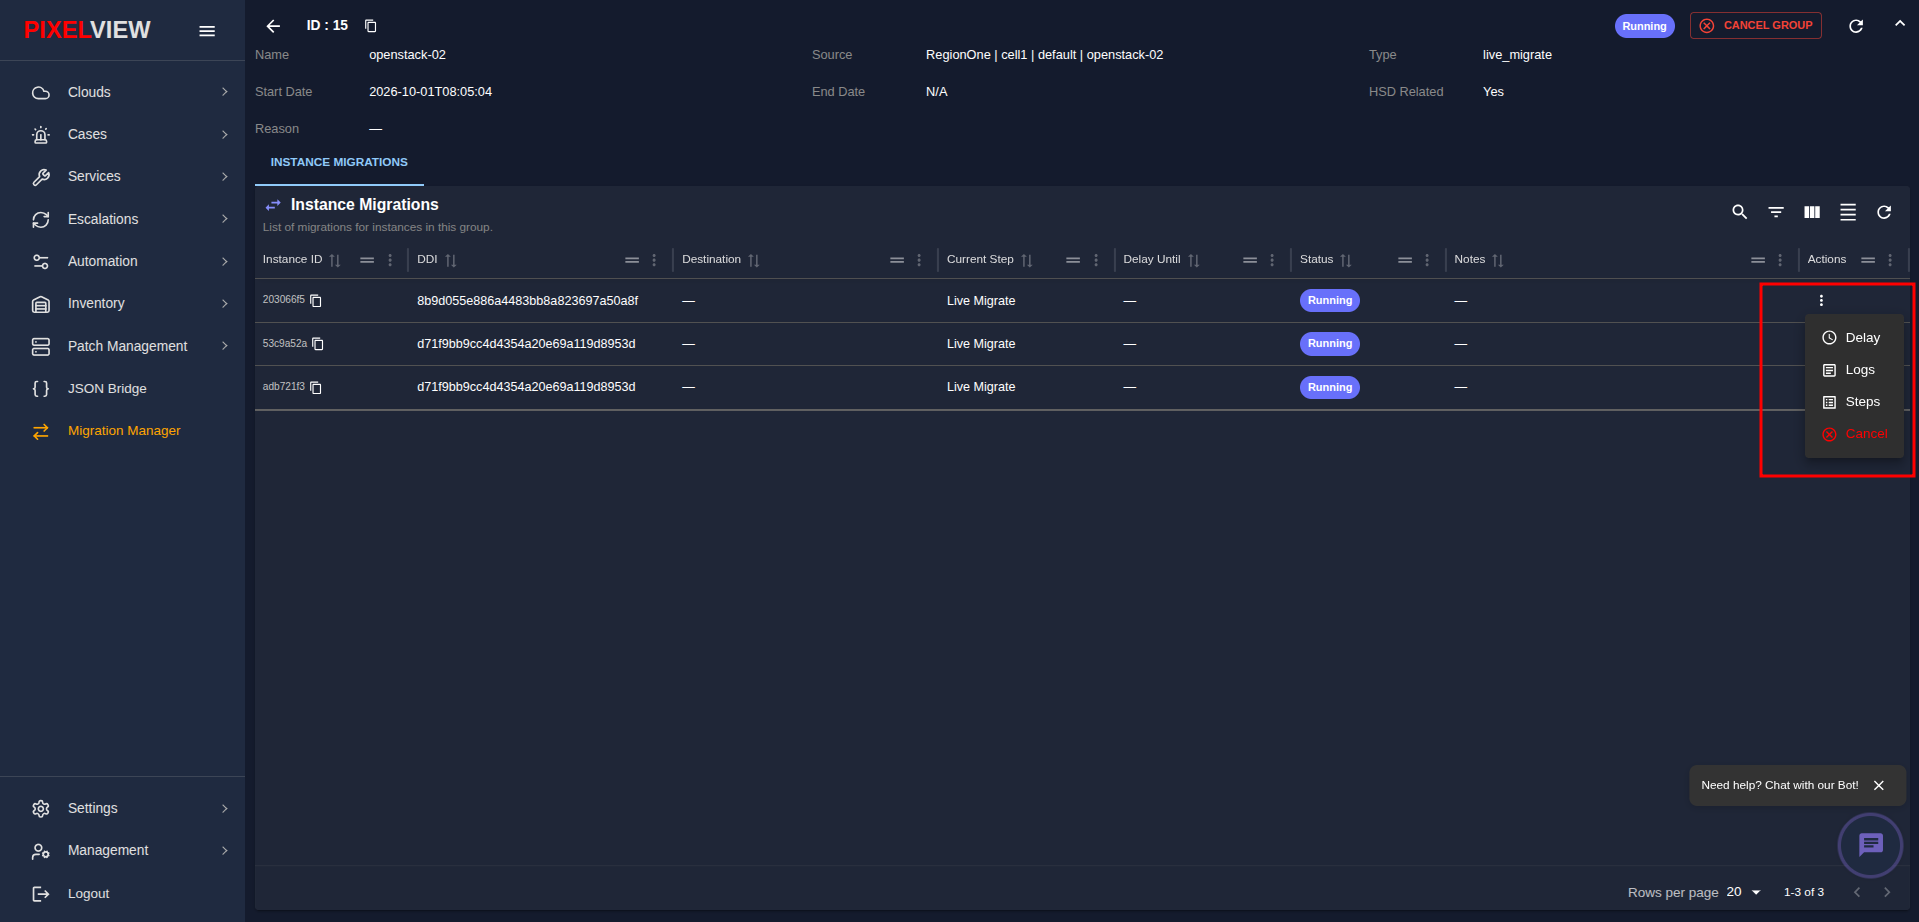
| Action | Purpose |
|---|---|
| Delay | Postpone migration of this specific instance to accommodate a customer maintenance window or active batch job. |
| Logs | Stream live execution logs to monitor progress or troubleshoot issues. |
| Steps | Inspect the step-by-step verification checklist. |
| Cancel | Cancel migration for this specific virtual machine without interrupting the rest of the group. |
Postponing (Delaying) an Instance
If a specific virtual machine cannot be moved immediately:
- In the instances table, click the Actions (
...) menu on the target row and select Delay. - The Delay Migration dialog opens:
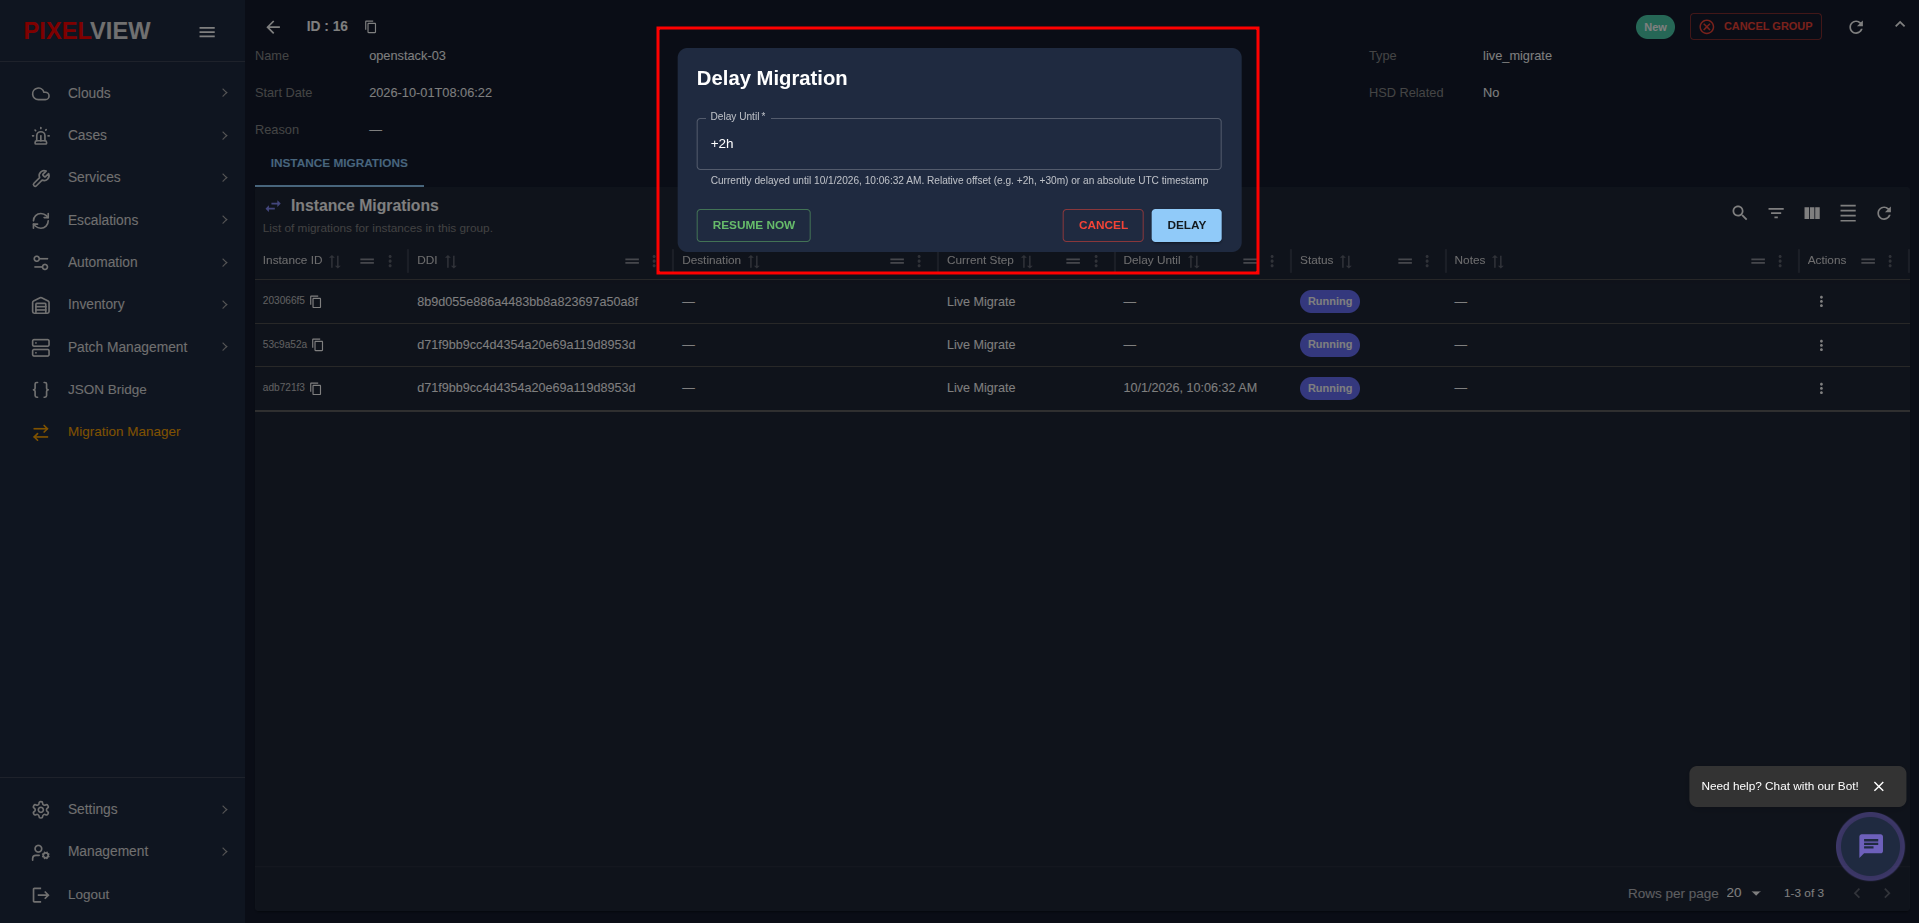
- In the Delay Until * field, specify when you want the migration to run. You can enter:
- Relative time offsets:
+30m(delays by 30 minutes)+2h(delays by 2 hours)+1d(delays by 1 day)
- Exact UTC date and time:
YYYY-MM-DD HH:MM:SS(e.g.,2026-10-01 16:00:00). - Click DELAY.
Delayed Instance Status
The Delay Until column in the table updates with the scheduled timestamp:
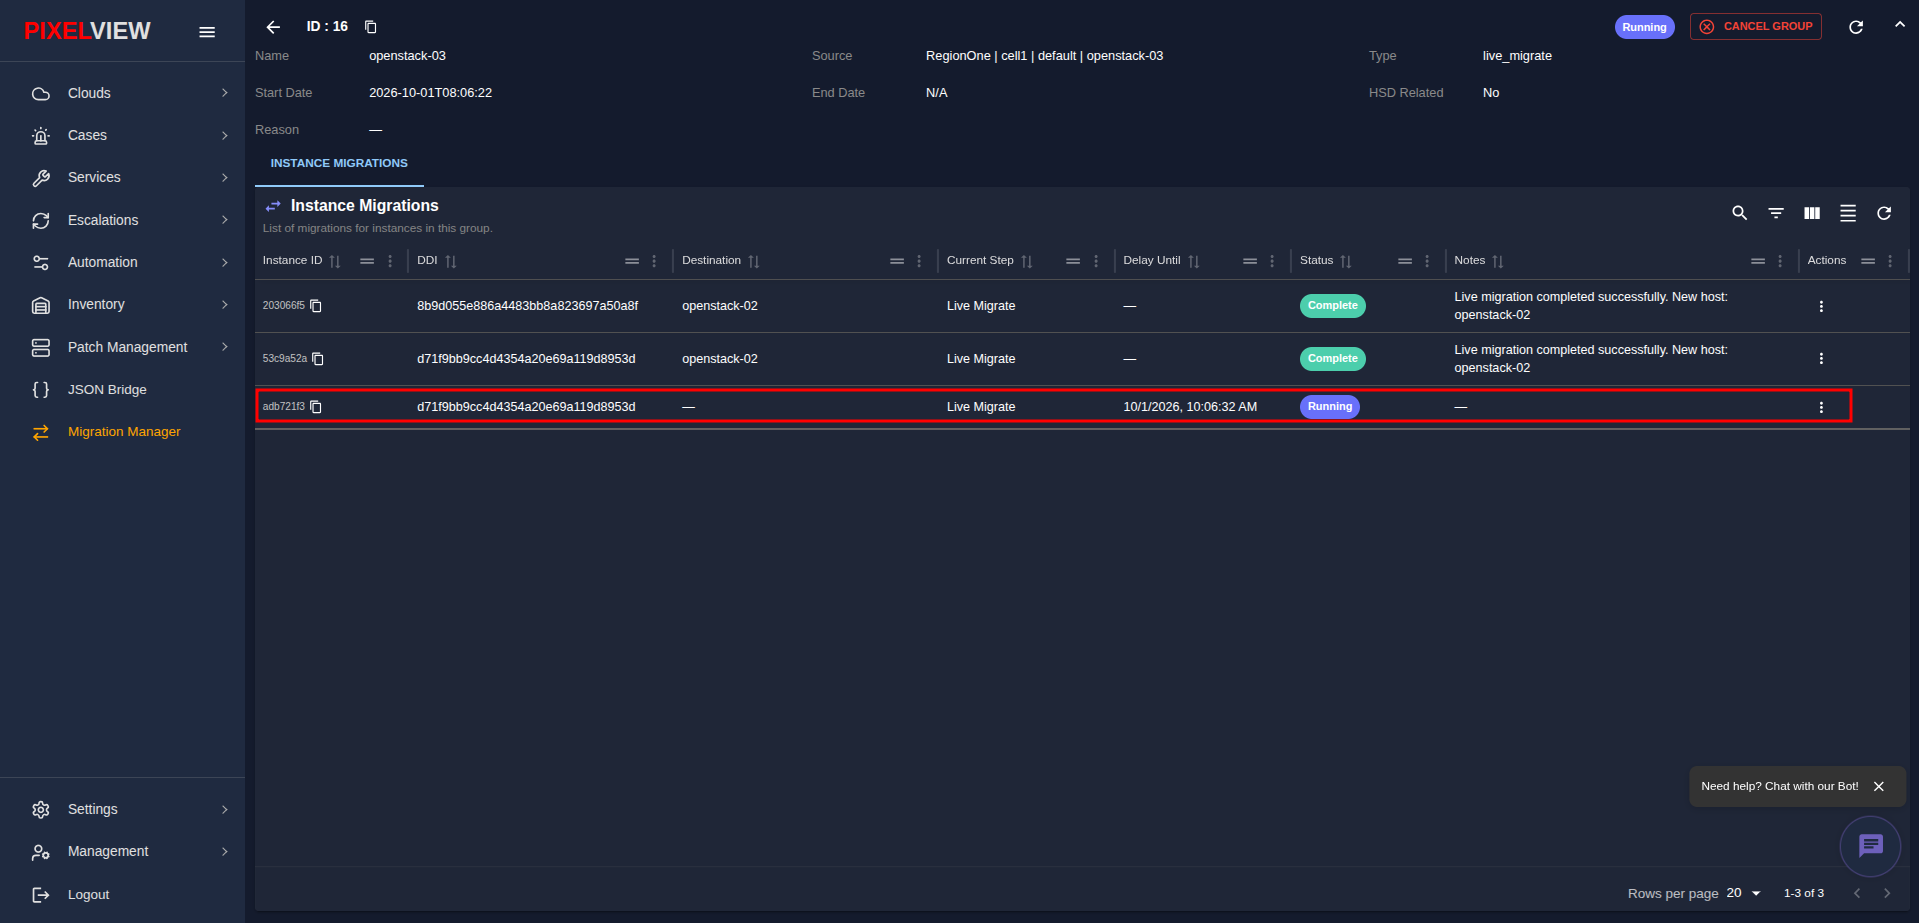
- The system skips this VM and continues migrating other instances on the host.
- When the scheduled time arrives, the instance automatically begins migrating.
Resuming a Delayed Instance Immediately
If maintenance finishes early or you want to migrate a delayed VM right away:
- Click the Actions (
...) menu on the delayed instance row and select Delay. - Click the RESUME NOW button.
- The delay is removed immediately, and the instance is queued for migration.
Viewing Live Instance Execution Logs
PixelView streams real-time execution logs directly to your browser, allowing you to monitor progress and diagnose issues without logging into backend servers:
- Click the Actions (
...) menu on the instance row and select Logs. - The Instance Migration Logs dialog opens:
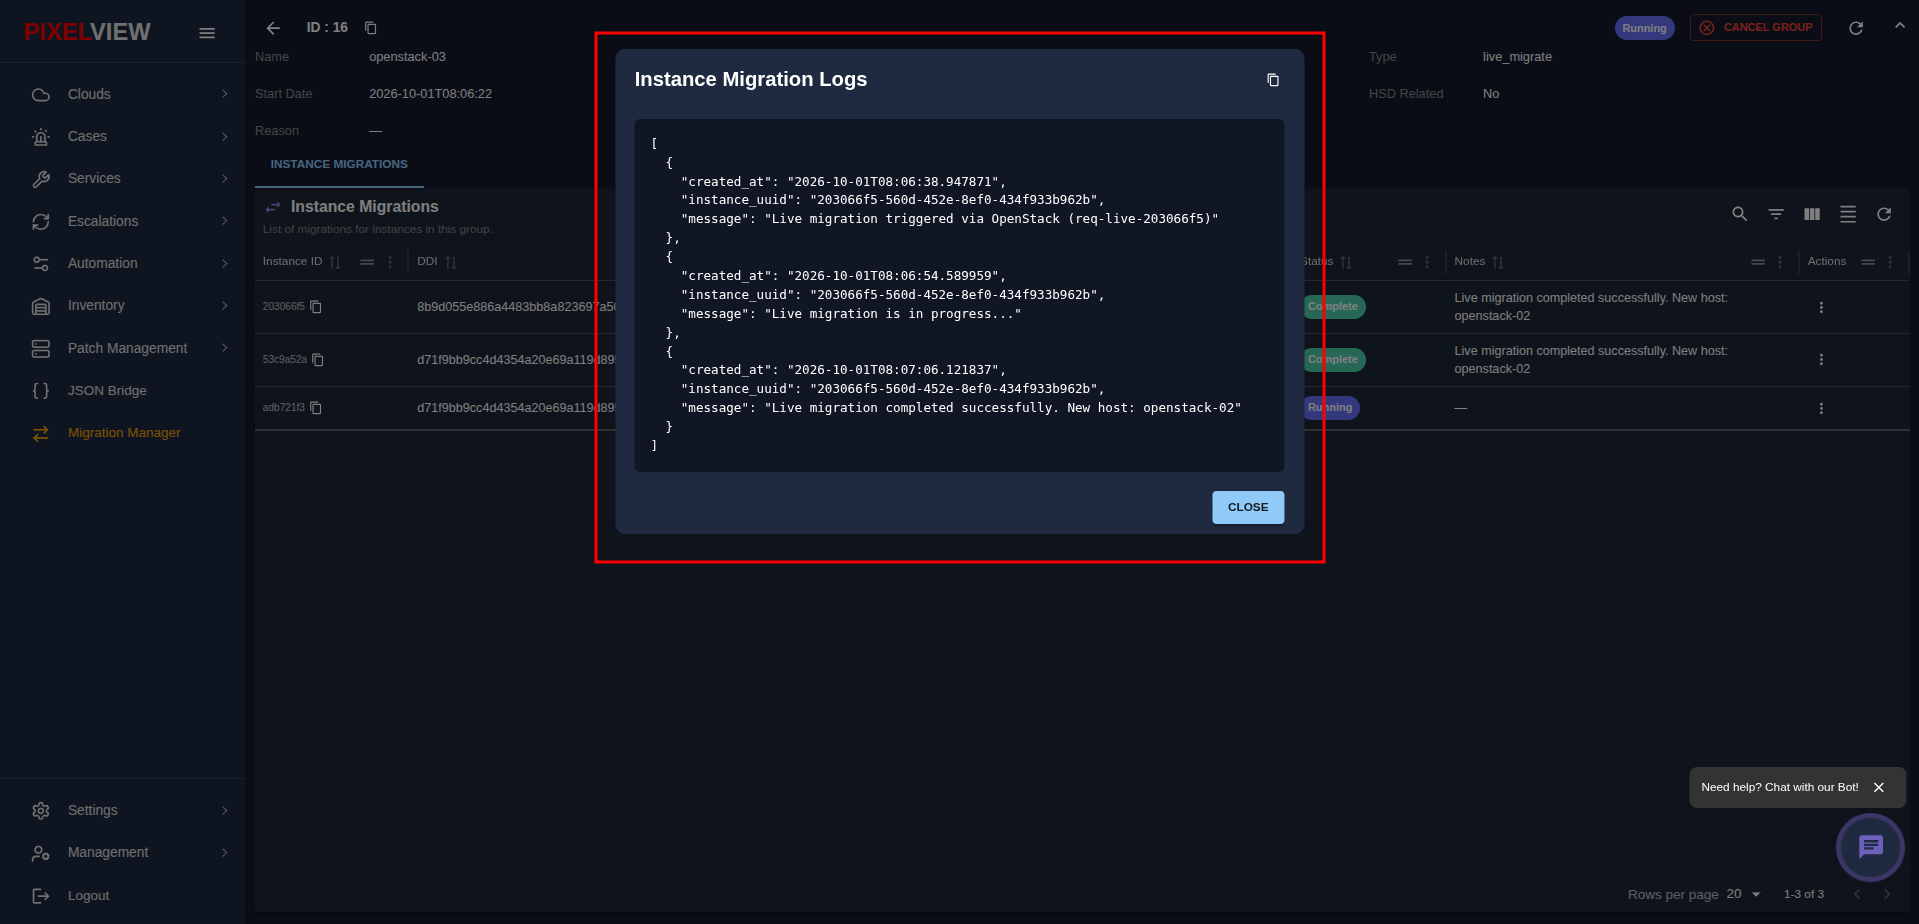
What the Logs Show
- Live Telemetry: Real-time notifications of pre-checks, memory copy iterations, and hypervisor handoffs.
- Timestamps: Exact time each action was dispatched and verified.
- Diagnostic Messages: Detailed error payloads if an instance encounters pre-flight issues, making it easy to identify missing network bindings or capacity limits.
Checking Step-by-Step Progress
To verify the completion checklist for an instance:
- Click the Actions (
...) menu on the instance row and select Steps. - The Migration Steps window opens:
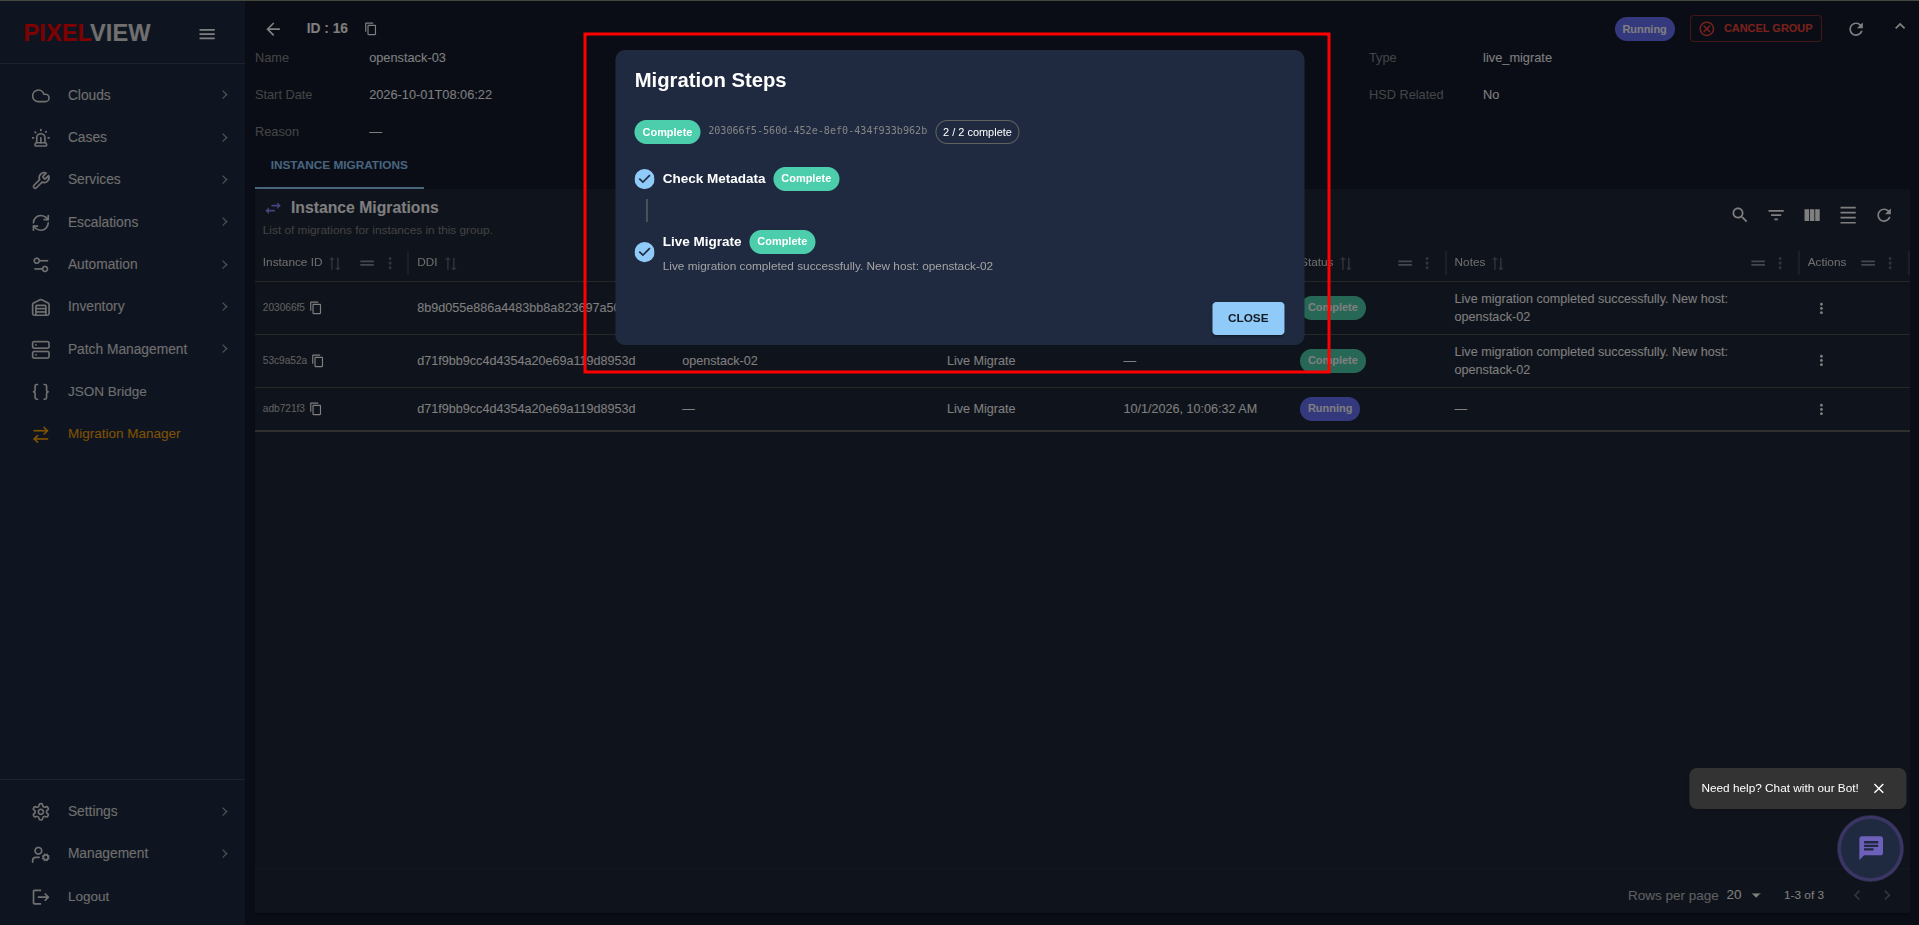
What the Steps Mean
- Check Metadata: Confirms the VM power state, verifies that the destination hypervisor has adequate unreserved CPU and RAM, and checks network port compatibility.
- Live Migrate: Transfers active memory and CPU registers to the target host, completes cutover, and confirms the instance is running on the new hypervisor.
Cancelling Compute Migrations
- Cancel a Single Instance: Click the Actions (
...) menu on any pending or delayed instance row and select Cancel. The instance status updates toCancelledwhile other instances continue. - Cancel the Entire Group: Click the red CANCEL GROUP button in the header toolbar of the group details page. All unstarted instances are stopped immediately. In-flight instances conclude their active data transfer safely to protect data integrity.
Compute Troubleshooting & Tips
- Why is an instance waiting for concurrency limit?: PixelView limits concurrent migrations per host (default: 5 concurrent instances) to protect network bandwidth and CPU stability. Queued instances begin automatically as active ones complete.
- What if an instance fails pre-checks?: Open the Logs dialog on the failed row. Common reasons include insufficient memory on the destination host or a missing VLAN/network binding.